Month: June 2020

6 Plumbing Emergencies That Every Homeowner Must Know

Many plumbing problems will reveal themselves gradually, providing homeowners with an opportunity to have them repaired without the help of an emergency plumber in Pittsburgh, PA. However, others can rise suddenly, creating stunning, inconvenient emergencies that require immediate attention. Those plumbing emergencies are most pressing because they can cause significant damage to other portions of your house in addition to creating breaks in service and potential messes.

Fortunately, when you experience these urgent plumbing problems, you can call on emergency plumbers to provide you with rapid response, timely repairs, and quality customer service. Many plumbers offer 24/7 service that can help bring your plumbing nightmares to a quick, minimally disruptive end. Read on to learn about six of the top plumber emergencies that every homeowner may encounter at some point.

Toilet Overflows

Your toilet is a simple bathroom fixture, but it’s critical to your health and sanitation in the home. However, as simple as it is, it can evolve into a nightmare when there’s a blockage in the drain that causes the toilet to overflow. The initial cause of an overflow is a clogged drain, but it’s the water that continues to flow into the bowl that can lead to the overflow. Cut off the water supply to the toilet during an overflow and immediately call a plumber.

No Hot Water

The water heater is a tremendous convenience, and showers would be miserable without it. That’s why it’s so discouraging when you turn the hot water spigot and only get cold water from the faucet. You may have personally experienced this plumbing emergency, and it quickly highlights just how dependent we are on our household hot water. We use it to wash clothes and dishes, and it’s important for personal hygiene. The causes of this plumbing emergency can be varied and can include a water heater malfunction, leaky hot water line, or disruption of the heater’s fuel source.

Plumber working on pipes

Sewer Blockages

The sewer line is what connects the drain system in your home to the larger sanitary sewer system beneath the street. When it backs up due to root growth or inappropriate items placed in the drain, nothing will leave from any drain in the home. That makes it a true plumbing emergency, and as such, it deserves an emergency response.
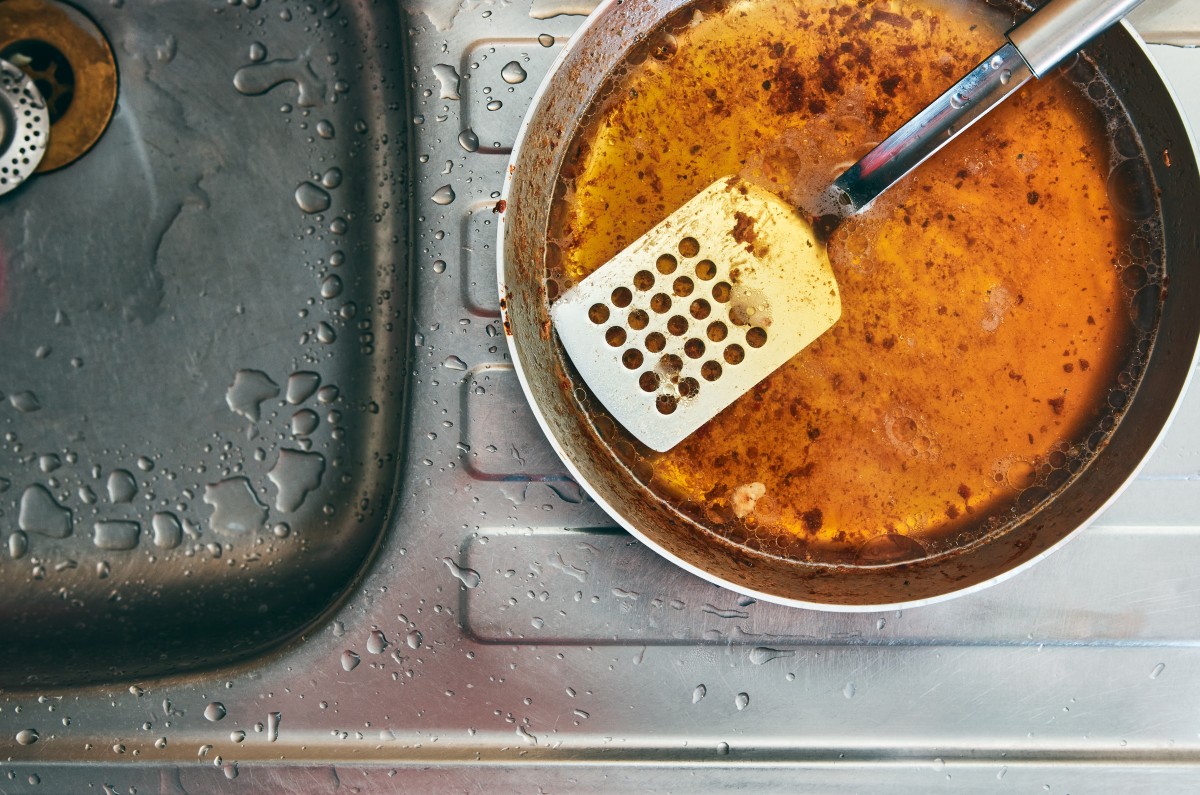
Clogged Drains

Even when you’re militant about monitoring what goes down your drain, clogs can occur. Oil and grease will build up over time as it congeals in the cooler temperatures present in the piping. Then there’s food debris, hair, and toilet tissue that are routinely put in the drain during regular use. Those items can eventually cause clogs in the traps beneath your sink and tub drains, and if they’re found beyond the trap, you may need an emergency plumber to get things flowing again.

Supply Line Leak

When the plumbing that brings water into your home breaks down, a leak can occur. If that leak is above the floor, you will more than likely see the signs, which could include hissing or dripping sounds and wet spots in walls and flooring. A slab leak may be undetectable without an inspection, only manifesting on your water bill through a major increase in usage. Some minor leaks can be repaired by a handy homeowner, but the fastest way to get a remedy is with the help of an emergency plumber.

Frozen Pipes

When the temperatures outside plummet, your water supply lines may be exposed to freezing temperatures. That means that the water inside the pipes will freeze and expand, and that can cut off your water supply in the short term and create major leakages after thawing. If it’s freezing outside and you suddenly can’t coax water from the tap, you should contact an emergency plumber to get things flowing once again.

If you’ve experienced any of these emergencies at your home, the best course of action is to contact Stahl Plumbing, Heating & Air Conditioning, an emergency plumbing service in Pittsburgh, PA, immediately to get a quick resolution. Call (412) 273-1000 today.

The post 6 Plumbing Emergencies That Every Homeowner Must Know appeared first on Stahl Plumbing, Heating & Air Conditioning.

Why Are My Drains Gurgling?

Do you know that a gurgling drain is not a normal occurrence? It’s true—optimally functioning plumbing systems should not gurgle. If you hear gurgling noises, it means that there is something wrong within the plumbing; and if gurgling is happening frequently, then you should start investigating before you have to deal with more extensive plumbing problems.

Do not ignore those gurgling drains any longer. Here is everything you need to know about noisy drains, including how to diagnose the issue and troubleshooting tips:


Why Do Drains Gurgle?

There are multiple causes behind gurgling drains, depending on the location and what is happening when hear the gurgling. Taking note of these instances will help you diagnose the problem, though. To begin, gurgling is is the result of something that prevents air or water from flowing through the drains. As water begins to travel along the pipe, air bubbles form, and that is the result of the gurgling or blub blub or any other sound.


So, in short, gurgling is caused by a partial blockage within a pipe.


Relevant: How To Build A Drainage Catch Basin

Diagnosing Gurgling and Other Noises Coming From Drains

Anything connected to your plumbing system could gurgle, be it the bathroom or kitchen sink, the toilet, the shower, or even appliances like the washing machine and dishwasher.


Blocked Drains

There are two kinds of blockages—partial and complete—but only one will actually cause a gurgle in your drains.


Partial Blockage

A partial blockage means your drains are halfway or almost completely blocked, allowing only a small amount of air and water to trickle past. Depending on the location of the partial blockage, the steps you take to resolve the situation differ. However, you can begin the process by using an environmentally safe drain cleaner that doesn’t use harsh chemicals or something like vinegar and baking soda to break down the blockage.


Complete Blockage

If you fail to fix a partial blockage, your drain will eventually be completely blocked. This can cause water to backflow into your sink or toilet or shower/tub instead of draining out.


Here are some causes of a complete blockage:


  • Dirt
  • Dead skin
  • Soap, shampoo and conditioner residue
  • Oils, grease, and other debris from cooking
  • Toilet paper
  • Hair
  • Small objects or toys that are accidentally sucked down the drain


If multiple drains are gurgling all at once, it typically means that the sewer line is blocked. In that case, you may need a professional plumber to inspect the pipes.


Blocked Vent System

If you hear the kitchen sink gurgling as the washing machine runs, it could be a sign that there is a block plumbing vent. These vents help air pass from the drains and reduce the risk of disrupted water flow. Drain and sewer vents are connected to every fixture in your home. Unfortunately, if the vent pipe is clogged, the plumbing system cannot operate.


Here are some ways to figure out if the vent system is blocked:


  • Smelling foul odors coming from the drain
  • Noting the slow speed of draining water
  • Gurgling drains
  • Checking the roof—where plumbing vents are located—for any damage or debris near the vent. Sometimes, birds could build a nest in the vent, so you may have to clear it out.


If you smell anything noxious, call a plumber immediately. The situation can become hazardous to you and your family. Most often, vent pipes are cleaned with a drain auger.


Blocked Sewer Line

As mentioned earlier, sometimes it is not the drain line itself but the sewer line that is congested that causes multiple drains to make noise. The gurgling will usually happen when a large amount of water is leaving the household and traveling down the sewer line or into the septic tank. Since this is the main outlet, the air that travels back through the system could affect every drain close to the sewer line.


Causes of blocked sewer lines include:


  • Broken pipes
  • Tree and plant roots
  • Clogs caused by certain items, such as tissues, paper towels, floss, Q-tips, feminine hygiene products, baby wipes, diapers, and so on


Tree roots are bound to invade sewer lines, especially those that have been underground for some time. The roots search for moisture and will work into the nooks and crannies of older sewer lines to reach the water. When this happens, extensive repairs and replacements may be necessary.


Next, bathroom products. Many clogged sewer lines are caused by products not meant to be flushed. Ever. These items do not disintegrate in water or can even transform into sticky goop or expand and harden.


Blocked or Damaged P-Trap

A P-Trap is a specially designed piece of pipe that protects your house from the fumes that rise from the ewer system. Since these fumes can be hazardous to your health, you want to avoid them. Unfortunately, if there are blockages in the P-Trap, this means they will not function properly.


Sniff out the potentially blocked or damaged P-Trap. Flush a toilet or run some water to see if you smell anything. Since P-Traps can be under the sink or in a bathtub or work for the whole house, you should call a plumber to do the job.


Stop That Gurgling Drain Today

A gurgling drain is not something to be ignored. It is a sign that points to a potentially extensive and expensive repair, especially if one day that gurgling suddenly stops and is replaced with a flood. Now that you know the signs and causes of gurgling drains, start looking for the cause or call a professional plumber to help. Sometimes, the issue can be resolved swiftly, while other times might need a more experienced hand.

The post Why Are My Drains Gurgling? appeared first on The Irish Plumber.

How To Build A Drainage Catch Basin

Are you struggling with settled water in your hard? Is your foundation at risk of water damage or cracking? Is there too much runoff from the road? One method for tackling any of these issues with standing water or flooding on your property is to build a drainage catch basin. The sole purpose of a catch basin is to collect this water or snow melt or runoff and send it somewhere else.


If you want to collect standing water, then you need a drainage catch basin. Here is everything you need to know, including how to build a drainage catch basin in your yard.


What Is a Drainage Catch Basin?

A drainage catch basin is basically a storm drain for your backyard (or anywhere it is needed). Catch basins are made to redirect water away from another place in an attempt to stop flooding before it starts. If you live somewhere that gets a lot of rain or snow, has runoff from streets, or simply experience a lot of sitting water, a catch basin could help.


Residential drainage catch basins are usually installed at the lowest point of your property where water gathers. Properties that have uneven terrain may require two or more catch basins.


In short, the benefits of having a catch basin are:


  • Prevents flooding around your property
  • Protects your lawn and landscaping from water damage
  • Helps route water away from your home’s foundation and driveway
  • Stops unpleasant odors from stagnant water and mosquito infestation


How Do Catch Basins Work?

A catch basin works on the simple premise of collecting water in an underground basin or tank. Some people might choose to use a trench filled with gravel that allows water to absorb slowly throughout their yard while others may choose a bucket or container that is connected to a reservoir or sump or a municipal water treatment center.


Concrete drainage catch basins have inlet and outlet pipes, metal grates, and a tank of some kind. As water rushes in through the grate, it fills the basin. Once the water reaches a certain height, it travels down the outlet pope into another location. The metal grate is meant to keep out debris—leaves, sticks, and garbage—that could clog up the inlet and outlet pipes.


How to Build a Drainage Catch Basin

Now it is time to outline some quick and easy-to-follow steps that help you build your own catch basin. Remember, this is a general set of steps. Depending on your yard’s layout, low points, and even the quality of the soil, these instructions may need to be modified.


You can buy all the materials needed for a catch basin from a drainage or plumbing contractor or from a local home improvement store.


Here is how to build a catch basin:


  • Seek out the place in your yard where water is accumulating. Stake this location. From there, chart out the course of the outlet pipe. Make sure the course is straight, direct, and goes away from your house.
  • At the staked location, dig a hole that is as wide as the top of the metal grate and as deep as you think is necessary. Usually, the basin is around 15-30 cm deeper than the size of the basin; it can be made larger to suit your needs.
  • Along the course you have plotted for the outlet, dig a descending trench that is around 20 cm wide and 46 cm deep.
  • Prior to installing the basin and the pipes, make sure that all connections between the basin and the outlet pipe is watertight. You do not want water to leak out. To ensure the connection is secure, use a waterproof silicone on the outside of the basin where it connects to the outlet pipe. Then insert the pipe into the hole, twisting to lock it in place. Some catch basins already have a watertight gasket included.
  • Now that the outlet is sealed, flip the basin over and drill a few holes into the bottom. This will prevent water from standing at the bottom of the container.
  • Fill about 15-30 cm of the hole you dug for the basin with gravel. Insert the basin on top of the gravel layer. The height of the basin should be level with the ground around it. If necessary, add some more gravel.
  • With the basin in place, attach the drainage pipe to the inlet. Again, the connection between the two needs to be watertight. Add silicone.
  • Lastly, glue every section of the drainpipe together until reaching the point from which the water will drain.


Tips For Maintaining Your Catch Basin

Now that you have installed a drainage catch basin in your yard, it is time to consider how to maintain it. Catch basins, just like other methods for protecting your home, need to be maintained in order to work properly. After storms, it is best to check the metal grate for any debris. Clean away any objects that could block the drain.


In the event your catch basin gets clogged or sediment has gotten too high, you can call a professional who has a vacuum truck or vacuum extractor to come. While you could clean the basin yourself, a professional ensures it gets done right the first time.


Occasionally, drainage catch basins will leak or crack. Pipes that have cracked will need to be extracted and repaired or replaced by a plumbing specialist. Fortunately, most repairs do not require the specialist to dredge up your entire yard.


Conclusion

There you have it—everything you need to know about catch basins and how to install one in your yard. Installing a drainage catch basin is an easy process. All you need to do is locate the lowest point in your property and follow the steps listed. But you need to keep in mind that maintenance is key to keeping it functioning! If you need assistance with maintenance or with repairs, don’t hesitate to call a drainage or plumbing professional.


The post How To Build A Drainage Catch Basin appeared first on The Irish Plumber.

How to Fix Low Water Pressure When You Have a Well System

Does your home get its water from a well system? If you answered yes, then chances are you also have low water pressure. Rather than living with low water pressure (which can be miserable for many), there are methods you can utilize to improve the water pressure. You can start by…

well system service

Servicing Your Pressure Tank

A home’s average water pressure should lie between 40 and 60 psi. For those who need to increase this number:

  1. Turn off the circuit dedicated to the well pump
  2. Test the air fill valve with an air pressure gauge and see where your pressure lies
  3. If the water pressure is floating around 40 psi or below, increase it by adjusting the pressure switch (this is located on the pipe connecting the well and pressure tank)
  4. Turn on the circuit and test out the water by opening a faucet
  5. Readjust if necessary by repeating these steps

Having Your Pipes Checked

A common reason for low water pressure is because of plumbing pipes that are clogged with tons of sediment and minerals. This buildup will occur in homes that have hard water, which will damage plumbing and prevent a smooth flow of water. Combat this by having your pipes inspected, cleaned, and having a water softener installed (or having your current one serviced).

Installing a New Constant Pressure System

To assist your pressure tank in providing your home with an increased amount of water pressure, consider installing a constant pressure system. This piece is installed on the water line that enters your home and will prevent water pressure from dropping when multiple fixtures are being used. Contact your local plumber to install new parts and pieces, and to inspect and service your plumbing.

Unsure if a constant pressure system is right for you? The experts at Len The Plumber also offers water pressure booster pumps, and can help determine the best solution for your well water system!

Permanently Improve Your Water Pressure

Having low water pressure can be caused by many different reasons, but there are just as many ways to improve it. When you need a plumber to service your well system and address low water pressure, contact Len The Plumber.

If you’re looking for a reliable plumber, check to see if you live in one of our many service areas!

This post first appeared on https://lentheplumber.com

What to Do if Your Dishwasher Isn’t Draining

Most people consider the dishwasher such an essential appliance that the absence of one in the kitchen has been known to be a deal breaker in selling a house. But like every appliance, it sometimes has issues. While our master plumbers at Adams and Son Plumbing typically don’t recommend taking the DIY route, troubleshooting problems with a dishwasher is relatively easy, and can save you money if you’re able to do so.

Knowing the basics of how a dishwasher operates is helpful. The dishwasher is connected to a drain hose that runs water into the pipes under or into your sink. Eventually, the plumbing connections in your sink begin to deteriorate and need to be replaced – or excess debris may be clogging the bottom of your unit. The issue you notice can provide an important clue about what’s wrong.

Try running the garbage disposal

If you find the bottom of the unit filled with dingy water, you may assume the cycle didn’t complete, and run it again. As Bob Villa observes, “If a dishwasher gets inadvertently shut off during a cycle, there’ll be standing water in the bottom when you open it.” If running the dishwasher again doesn’t resolve the issue, an interrupted cycle wasn’t the cause.

Should this be the case, Villa advises running the garbage disposal. Why?  Because the drain hose from your dishwasher empties into the garbage disposal drain. If the disposal unit contains unground food – or if food sludge settles in the drainpipe below the disposal – it can prevent the dishwasher from draining properly.

“Sometimes, just running the disposal is all it takes to get the dishwasher draining again,” Villa writes. “In fact, get in the habit of leaving the water on and letting your garbage disposal run an additional 15 seconds after the food is gone. This clears all remaining food that might otherwise remain in the P-trap drain beneath the disposal.”

Read our blog post – “Garbage Disposal Jammed? What You Need to Know” – to address and prevent problems with this kitchen convenience.

Don’t throw in the towel, dry with it

If running the garbage disposal doesn’t get your dishwasher draining again, you’ll have to remove the standing water before attempting further troubleshooting. Of course, if you don’t have a garbage disposal, go directly to this step.

Back to Villa, who recommends placing absorbent towels around the base of the dishwasher, then removing the bottom dish tray. Use a plastic cup to scoop the dirty water into a bucket. When the water level is too low to scoop, use towels to sop up the last bit in the bottom of the dishwasher.

Could your drain hose be blocked?

If the problem isn’t with the garbage disposal, the dishwasher’s drain hose could be blocked. Family Handyman provides a helpful step-by-step guide – with video – to troubleshooting three of the most common causes. We’re providing a brief overview. Refer to the guide itself for complete instructions.

First, check the drain-hose connection, drain-hose clamp, solenoid and power supply. If these are tight and functioning, look at the following.

1.Check the filter in the dishwasher’s tub. This is located either in the bottom of the tub – surrounding the base of the lower spray arm – or at the back. Although most newer-model dishwashers have small built-in grinders, pieces of food (like popcorn) and paper (such as labels washed off jars) can cause clogging. Clear the debris. Even if it isn’t the source of your current issue, you will have prevented a future problem.

2. Check the drain hose. Disconnect the power by either unplugging the dishwasher or turning off its circuit breaker. Remove the toe-kick, which is held in place by two or four small screws. Loosen the dishwasher drain hose clamp and disconnect the drain hose (which usually has ridges) from the pump.

Try to blow through the dishwasher drain hose to see if it’s clear. If it’s blocked, look for kinks in the hose and straighten them. Also check the disposer inlet or pipe where the dishwasher drain hose connects under the sink. If the inlet has a buildup of corrosion, clear it with a small screwdriver.

3. Check for a valve bracket. If your dishwasher has a valve bracket, it has a drain valve. To test the valve, push on the valve bracket to see if it moves freely. If the valve is frozen, the electrical solenoid that controls it is burned out and needs to be replaced.

Try baking soda and vinegar

If the problem persists, you can try another DIY technique. The Home Depot’s website provides an informative video involving a mix of equal parts baking soda and vinegar. Pour the mixture in the basket at the bottom of the dishwasher and let sit for 15 minutes. Pour hot water down the basket, and run the rinse cycle. By the way, The Home Depot video also includes instructions for the previously described troubleshooting techniques.

Ready to call a pro? We’re here for you!

Should none of these DIY remedies solve your problem – or you just don’t feel comfortable about attempting anything more complex than running the garbage disposal – give us a call! Adams and Son Plumbing has proudly served Central Florida homes and businesses with the highest level of full-service quality and experience for over 60 years. We are family-owned and operated, and all of our plumbers are state-certified master plumbers. Contact us to get – and keep – your home’s plumbing in top repair.


The post What to Do if Your Dishwasher Isn’t Draining appeared first on Adams and Son Plumbing Services.

Ways COVID-19 Has Impacted the Plumbing Industry

The COVID-19 pandemic has affected industries of all kinds, forcing some businesses to close while changing how others conduct business and serve their clientele. Here’s how the pandemic has affected the plumbing industry in particular.

  • The Plumber’s Uniform: Extra protection is necessary during the COVID-19 pandemic. Plumbers now work with shoe covers, gloves, respiratory masks, and contact-reducing guidelines to protect them from catching or spreading the virus.
  • Availability: Businesses across the country have remained closed to slow the spread of the pandemic. However, many people are unaware that plumbing services are still essential and, therefore, available. Your local plumber is still a phone call away.
  • Supplies: Many manufacturers have slowed or delayed production, which may interrupt access to certain appliances and plumbing-related products. But plumbers are doing their best to keep up with their customers’ needs.
  • Demand: The demand for plumbing services has actually increased compared to this time last year. Customers are requesting to have bidets and touch-free appliances installed. They’re also contending with extra clogs due to reliance on supposedly flushable wet wipes.

Whatever your plumbing needs may be, call Stahl Plumbing, Heating & Air Conditioning. We are working hard during this difficult time to ensure your home or business has access to safe and reliable plumbing. We perform maintenance, repairs, installation, and more. You can even rely on us for HVAC services in commercial and residential properties. Do you have an emergency? We proudly offer 24/7 services for all of your urgent needs, too. Call us today and find out why Pittsburgh, PA, and Allegheny County residents come to Stahl Plumbing first for all their plumbing and HVAC needs.

The post Ways COVID-19 Has Impacted the Plumbing Industry appeared first on Stahl Plumbing, Heating & Air Conditioning.

Ways to Improve Your Home’s Plumbing

thumbs-upWhen thinking of ways to make home improvements, you probably don’t first think about “plumbing upgrades.” We admit that it doesn’t sound terrifically exciting. But your plumbing is an essential part of your daily life, and upgrading older parts of it with fresh installations can make a huge difference. It can be a difference in convenience, or water savings, or problem prevention. Sometimes it can be all of these.

Below is a list of some upgrades to think about making this summer for your plumbing. We’re the Glendale, AZ, plumbers who can simplify the process for you and provide the installations and replacements that will have you set with great plumbing.

Replace the Garbage Disposal

How old is your kitchen’s garbage disposal? We’ll wager the answer is “as old as the kitchen.” Most homes still have the same disposal they started with. If that disposal is more than 10 to 15 years old, it’s about time to have another one put in. A disposal does an immense amount of work each year, and the mechanical parts will have worn down after more than a decade to the point that the unit won’t work well anymore—which eventually means clogging and an abrupt breakdown. Putting in a new unit will make your kitchen hum along much better.

Install an Automatic Shut-Off Valve

If your home doesn’t have an automatic shut-off valve for emergencies, we strongly recommend having our plumbers install one. This is an important protection against flooding damage: the valve shuts off the flow of water in case flooding starts. This is helpful in almost any situation, but it is most valuable for times when you are away from home, such as on vacation. This emergency shut-off valve will give you peace of mind and help stop major, expensive water damage.

Install a Sump Pump

This is another protection from flooding we recommend. A sump pump automatically removes excess water and moisture from the lowest part of your house, such as the crawl space.

Install a Water Softener

Hard water is a major problem throughout the Valley, and it may be affecting your home without you realizing it. The way to find out if you have hard water or other water quality problems is through water testing, a service we offer. If we discover you have hard water, we can counteract it by installing a water softener. This is a natural method to remove the hard minerals from your water to protect your plumbing, water heater, laundry, and appliances from the ravages of hard water.

Repipe Part (or All) of Your Home

Repiping is a major upgrade for a home—taking out older pipe materials such as galvanized steel and polybutylene plastic and putting in copper, PEX, and CPVC piping in its place. Depending on the age of your house, you may need sections repiped or may need the whole house repiped. This is a big job, but it prevents major water waste, corroded piping, and massive water damage.

The Trusted Plumber serves Glendale, AZ, and the surrounding areas. Speak to one of our plumbers today to see how we can help.

This post first appeared on https://www.thetrustedplumber.com

Does Your Sump Pump Need a New Battery?

Your local plumbing team should set you up for long-term success with your plumbing system. After all, you rely on your pipes and plumbing fixtures to function like clockwork, protecting your property and the people you care about. The top plumbing service company in Pittsburgh, PA, can also fix your sump pump and make sure this part of your plumbing system is working properly. Here’s everything you need to know about your sump pump, including signs that you need a new battery.

What Is a Sump Pump?

Starting with the basics can give you a better idea of what your sump pump does and why it’s so important. This pump is usually located in the lowest level of your home or business, and it removes excess water from the plumbing system. Sump pumps keep water levels under control and prevent flooding.

How Can You Tell if Your Sump Pump Works?

While it’s never a bad idea to bring in trusted experts for affordable plumbing service, it’s pretty easy to tell if your sump pump is working. You can test the pump by filling the basin with water and seeing if the pump turns on and starts working. If you have power to the outlet and the pump isn’t draining the water, then you know it’s time for a replacement. Noticeable leaking from the discharge pipe or pumps that don’t shut off quickly may require repair or replacement.

Why ISump pumps a Backup Battery a Good Idea?

Those who specialize in plumbing installation services often recommend a backup battery for sump pumps. It’s always better to be safe than sorry, and making sure you have a plan to fall back on in case of a power outage or flood just makes sense. Even if you invested in the best plumbing installation services, your sump pump could still be at risk of malfunctioning or running out of power in the event of a catastrophe. If your sump pump does fail for any reason, you will have a better chance of protecting your home from water damage if there’s a backup battery for your system.

How Do You Test a New Battery?

Plumbing professionals recommend testing batteries. Just checking the water levels twice a year and remembering to test your sump pump system every once in a while can make for a simple and straightforward experience. Normal standby batteries have a life span of five years, so just make sure you keep them charged and prioritize plumbing maintenance as best you can. If you have a serious storm, flood, or appliance malfunction that causes your sump pump to work overtime, you definitely want to check on the condition of the batteries.

How Long Will a Sump Pump Last?

The more maintenance you put into your sump pump, the longer it may last. If you make sure to check on this system and keep a backup battery just in case, you may be able to go nearly a decade without replacing your sump pump. Keep in mind that repairs or replacements may be necessary if you notice excessive vibrating, weird noises, or motor failure. When in doubt, a professional plumber can let you know if your sump pump and its batteries require any attention.

If you need help with your sump pump or the rest of your plumbing system, call the top plumbing installation contractor in Pittsburgh, PA, Stahl Plumbing, Heating & Air Conditioning today.

The post Does Your Sump Pump Need a New Battery? appeared first on Stahl Plumbing, Heating & Air Conditioning.

The Benefits of an Air Purifier

There are a lot of harmful particles in our air, from germs to mold spores, that can inhibit our day to day life. Not only that, but those same organisms can produce powerful odors that can be nearly impossible to get rid of with standard cleaning equipment. Our noses might get used to the scents in our houses, but it doesn’t mean those nasty particles aren’t still there.

Air purification is a practice that’s been happening for thousands of years, from using specific medicinal candles to the utilization of salt lamps, but even with those small changes, it’s just not enough. That’s where we come in!

We provide sensible installation services for air purifiers in Clifton, NJ. By using advanced technology that only certified contractors have access to, we can destroy those harmful particles in your air and improve the smell of your home. Let’s talk about some of the benefits that come from a system like this.

How Does Air Purification Work?

Well, in our neck of the woods, there are two specific types of air purifiers that we use. These are electronic air purifiers and UV light purifiers. Each one of these systems uses its own process to effectively eliminate harmful particles and improve the smell of your home. Here’s how they work:

  • Electronic air purifier. These systems are complicated but stay with us. They ionize individual particles in the air by charging them with electrons. This ionization process can help the system identify and locate other particles in the air and draw them in to be removed. Since these particles are charged, they can be collected on a plate that has the opposite charge, enabling your system to act like a “catcher” for everything in your air that you don’t want.
  • UV air purifier. These systems function quite differently, but their effect is similar. This type of machine uses ultraviolet light, or a germicidal light, that destroys the DNA of microorganisms, from mold spores to bacteria. By placing them in your home’s ductwork, they can be kept far away from you so that the light only affects the particles you’re hoping to remove. It’s that easy!

What Are the Benefits?

Well, for starters, you’re going to be dealing with fewer germs in your air. That means you can say goodbye to the reoccurring coughs, colds, and other symptoms that would normally appear because of your stuffy air. By removing harmful particles in the air, you’re effectively destroying germs before they can get to you.

Also, these germs (and especially mold spores) often carry powerful odors with them. Our noses are sensitive, which means it can be very easy to pick up on fowl scents that are brought from mold and bacteria. Luckily, these systems remove the odors in the air as well as the particles themselves, leaving your air smelling cleaner and fresher than it did before! Honestly, with the amount of money homeowners spend on candles and technology to improve the scent of their homes, investing in an air purifier sounds like a no brainer!

Call the pros at MarGo Plumbing Heating Cooling Inc. if you’re interested in an air purifier!

This post first appeared on https://margoplumbing.com

+1-877-959-3534