A properly working septic system should operate quietly and invisibly without offensive odors drifting through your home or yard. So when homeowners ask, “do septic tanks smell?”, the question usually comes after noticing a rotten-egg odor in the bathroom, a sewage-like scent near the lawn, or musty air around drains. In many cases, calling professional septic tank cleaning services can quickly identify the source of the odor and restore the system to proper working condition.
Those smells are never something to ignore. In most cases, they’re your septic system’s way of signaling a mechanical issue, overload, or developing failure. This guide delivers the most complete, plumber-level explanation available covering why septic systems smell, what the odors mean, how professionals diagnose them, and exactly what to do next.
Short Answer — Do Septic Tanks Smell?
No, healthy septic systems should not produce noticeable odors.
You might briefly catch faint gas near the tank during pumping or inspection, but persistent smells inside or outside the home are a warning sign.
When a Septic System Should Not Smell
- During everyday use
- Near toilets, sinks, or showers
- In the yard or patio
- Around drain fields
When Odors Signal Serious Problems
- Sewage backup risk
- Drain field failure
- Structural tank damage
- Blocked venting
- Harmful gas buildup
Red-flag scenarios include:
- Rotten-egg smell indoors
- Standing water in the yard
- Lush green grass over the drain field
- Gurgling drains
- Odors after heavy rain
Ignoring these signs can lead to property damage, groundwater contamination, mold growth, and costly full-system replacements.
What a Septic Tank Is Supposed to Smell Like (and Why You Normally Shouldn’t Notice It)
How Properly Working Septic Systems Handle Gases
Septic tanks rely on anaerobic bacteria to break down waste. This process creates gases mainly methane and hydrogen sulfide but those gases are safely managed through:
- Vent stacks that route fumes through the plumbing roof vent
- Sealed tank lids preventing surface leaks
- Soil filtration in the drain field
- Proper pipe slopes that move wastewater efficiently
When everything functions correctly, you’ll never smell what’s happening underground.
Why Homeowners Sometimes Never Smell Their Septic Tank
Homes with well-maintained systems benefit from:
- Balanced bacterial colonies
- Correct installation depth
- Watertight access covers
- Healthy, unsaturated drain fields
- Routine pumping
These elements keep odors fully contained.
Do Septic Tanks Smell Inside or Outside the House?
Smells can appear in several places and location matters for diagnosis.
- Inside bathrooms: often vent blockages or dry traps
- Kitchen sinks: grease buildup or trap evaporation
- Yard near tank: cracked lids or surface leaks
- Drain field: oversaturation or soil failure
Seasonal conditions play a role too. Summer heat increases bacterial activity, while Florida-style rainstorms can flood drain fields forcing gases upward through plumbing or soil.
Common Reasons Septic Tanks Smell
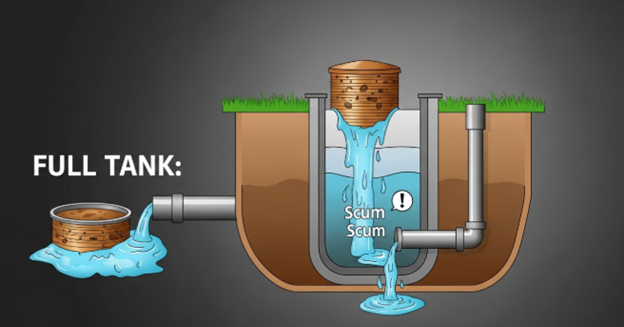
Full or Overloaded Septic Tank
Skipped pumping schedules and growing households overload tanks, forcing gases and wastewater backward.
Clogged or Broken Vent Pipe
Leaves, nests, or collapsed vent stacks prevent gases from escaping through the roof.
Drain Field Failure
Soil saturation stops wastewater absorption, causing odors at ground level.
Blocked or Dry Plumbing Traps
Unused sinks or floor drains lose water seals, allowing sewer gases indoors.
Tree Root Intrusion
Roots crack pipes and tanks, releasing odors and wastewater.
Chemical Damage to Beneficial Bacteria
Bleach, drain cleaners, and antibacterial soaps kill bacteria that digest waste.
Cracked Lids or Failing Seals
Damaged access ports let gas leak directly into the yard.
Real-World Plumber Case Study — Florida Homeowner With Septic Odor Problems
A Tampa-area homeowner reported strong rotten-egg smells after summer storms especially near the patio and guest bathroom.
Inspection uncovered:
- Waterlogged drain field from heavy rainfall
- Collapsed roof vent pipe
- Septic tank overdue for pumping by six years
How Professionals Diagnosed It
- Smoke test through plumbing vents
- Sludge-level measurement
- Soil saturation probes
- Camera inspection
Repairs Performed
- Emergency tank pumping
- Vent stack replacement
- Drain field aeration
- Water-use restrictions during recovery
Within days, odors disappeared. A new maintenance schedule plus Florida-specific wet-season precautions prevented recurrence.
Health Risks of Septic Smells You Shouldn’t Ignore
Septic odors aren’t just unpleasant:
- Hydrogen sulfide: headaches, nausea, dizziness
- Methane: explosion hazard in confined spaces
- Mold growth: moisture buildup indoors
- Groundwater contamination: bacteria infiltration
- Respiratory irritation: especially in children and seniors
Persistent smells always justify professional evaluation.
What to Do If Your Septic Tank Smells
Step 1 — Identify Where the Smell Is Coming From
Inside fixtures? Yard? Patio? Drain field?
Step 2 — Check Drains and Plumbing Traps
Run water in unused sinks or floor drains.
Step 3 — Inspect the Yard and Tank Area
Look for soggy soil, cracks, or exposed lids.
Step 4 — Look for Standing Water or Lush Grass
These often mark drain field trouble.
Step 5 — Confirm Last Pump-Out Date
Most systems need service every 2–5 years.
Step 6 — Call a Licensed Septic Professional
Odors rarely resolve permanently without expert inspection.
Step 7 — Implement Repairs and Maintenance Schedule
Fix structural issues and plan routine service.
How Professionals Diagnose Septic Odor Issues
Experts rely on:
- Camera line inspections
- Smoke vent testing
- Drain field probes
- Sludge depth gauges
- Soil percolation checks
- Pressure distribution analysis
These tools pinpoint failures before catastrophic collapse.
Septic Odor Fixes — What Actually Works
- Scheduled pumping
- Vent repairs
- Drain field restoration
- Root removal
- Lid replacement
- Controlled bacterial restoration (not miracle additives)
- Reduced water loads
Septic Smell Causes vs Solutions vs Severity
| Cause |
Smell Location |
Risk Level |
Typical Fix |
DIY or Pro? |
| Full tank |
Yard & drains |
High |
Pumping |
Pro |
| Clogged vent |
Bathroom |
Medium |
Vent cleaning |
Pro |
| Dry trap |
Sink |
Low |
Add water |
DIY |
| Drain field failure |
Yard |
Severe |
Field repair |
Pro |
| Root damage |
Yard |
High |
Excavation |
Pro |
How to Prevent Septic Tank Smells Long-Term
- Pump every 2–5 years
- Use water efficiently
- Choose septic-safe toilet paper
- Avoid wipes and grease
- Protect drain fields from vehicles
- Schedule annual inspections
- In wet climates like Florida, divert storm runoff away from the field
FAQs About Septic Tank Odors
Do septic tanks smell all the time?
No. Persistent odor means malfunction.
Can septic smells make you sick?
Yes hydrogen sulfide and bacteria pose health risks.
Do septic tanks smell after heavy rain?
Flooded drain fields frequently trigger odors.
Do septic tanks smell inside the house?
Yes, especially with vent blockages or dry traps.
How long do septic odors last?
Until the underlying problem is fixed, sometimes days, sometimes months.
Can additives stop septic smells?
Rarely. Structural problems require mechanical repair.
Does a new septic tank smell?
Only briefly after installation, not long term.
Is septic odor an emergency?
Yes if accompanied by backups, standing water, or strong sulfur smells.
When to Call a Septic or Plumbing Professional Immediately
- Sewage backups
- Persistent sulfur odor
- Yard flooding
- Multiple drains affected
- Gurgling fixtures
- Visible wastewater
Conclusion — Do Septic Tanks Smell and What Smart Homeowners Should Remember
So, do septic tanks smell? A functioning system should not. Odors are warning signs, not normal conditions. By maintaining pumping schedules, conserving water, protecting drain fields, and scheduling professional inspections with trusted experts like A to Z Statewide Plumbing, homeowners avoid major repairs and preserve property value.
If smells appear, act quickly. Early diagnosis saves thousands and keeps your home safe, sanitary, and odor-free.
This post first appeared on http://www.atozstatewideplumbing.com