Month: July 2023

These 4 Plumbing Problems Require a Plumber ASAP

plumber-with-tool-box-and-plunger

Plumbers do a wide variety of jobs, not just unclogging drains and repairing broken sink fixtures. Anything from installing a new water heater to doing gas line work is a job for a qualified plumber. Many of these jobs can be scheduled in advance because they aren’t urgent enough for an emergency response, but not all. Some plumbing problems require professional attention immediately, and a delay can mean the problem has a chance to get much worse. 

If any of these four things occur in your home, you have a plumbing emergency on your hands, and you need a plumber ASAP.

No Water

If you turn on a faucet in your home and no water comes out, there are a few steps you should take before deciding you have a true emergency on your hands. First, check other fixtures. Is there water anywhere else? If not, contact your municipal water provider, and if you can’t get a response from them immediately, ask your neighbors. Has everyone lost water? That would be a municipal problem, not an issue with your home’s plumbing. Does everyone else still have water? There’s probably something very wrong with the main pipe that brings water from your city supply line to your home. This is very urgent, and you need a plumber in Clifton, NJ right away.

Leaks

If a single fixture is causing a dribble, you may be able to shut off the water supply to that particular spot and wait a day or two for a plumber. But even a leak that doesn’t spray like a geyser can be an emergency. If you see a spreading water stain on a wall or ceiling, or a main pipe has a break or a disconnected fitting, you might not be able to stop it without using the main water shut-off and cutting off the water supply to your whole home. (You will find this indoors, on the wall facing the direction your water comes from, usually the side of your home facing the street, often in the basement.) If water is continuing to leak, or you’ve put yourself in a position of having no water in order to stop the leak, it’s definitely a plumbing emergency.

Frozen Pipes

During cold snaps in the middle of winter, the water can freeze in pipes that are close to the exterior of a home and not well insulated. This will prevent the water from flowing, but it’s a much more serious problem than that. The force of water expanding as it freezes is powerful enough to crack streets and sidewalks, and it can definitely rupture your pipes. You need a plumber right away. Don’t try to thaw the pipe yourself! The drastic shift in temperature could actually worsen the cracking. 

Sewer Problems

Overflowing toilet? All the drains in the house clogged at once? Foul odors rising from your drains? These all point to a major sewer issue. If sewage backs up into your drains or overflows a toilet, or if you breathe toxic sewer gasses because of a vent problem, your health could be in serious jeopardy. Don’t delay, and don’t DIY. This is an emergency for a qualified plumber to handle.

Contact MarGo Plumbing Heating Cooling Inc. today to get prompt assistance with your plumbing emergency!

The post These 4 Plumbing Problems Require a Plumber ASAP first appeared on MarGo Plumbing Heating Cooling Inc..

This post first appeared on https://margoplumbing.com

Why do I suddenly have low water pressure in my home?

low water pressure and reasons

Picture this: you’re standing in your shower, eagerly anticipating a relaxing cascade of water, only to be greeted with a feeble trickle. Low water pressure can be frustrating, disrupting your daily routines and leaving you scratching your head in confusion. In this blog post, we will explore some common reasons why you might suddenly experience low water pressure in your home and shed light on how A to Z Statewide Plumbing can help you restore that steady flow you deserve.

Sediment Buildup in Pipes
Over time, mineral deposits, sediment, and rust can accumulate inside your plumbing pipes. This buildup restricts the water flow, resulting in reduced water pressure. If you live in an older home with galvanized pipes, they are more susceptible to corrosion and sediment accumulation. A thorough inspection by a professional plumber can determine if sediment buildup is the culprit behind your low water pressure.

Leaky Pipes
Leaky pipes not only waste water but can also lead to low water pressure. Even small leaks can significantly reduce the water flow, affecting various fixtures throughout your home. If you notice damp spots, water stains, or hear the sound of running water when all taps are off, you might have a hidden leak that requires immediate attention.

Faulty Pressure Regulator
Pressure regulators play a crucial role in maintaining a stable and safe water pressure in your home. When the pressure regulator malfunctions, it can cause inconsistent water pressure. A plumbing professional can assess the regulator’s functionality and make necessary adjustments or replacements to restore the proper water pressure.

Partially Closed Valves
Sometimes, the solution to low water pressure can be surprisingly simple. Check all the water supply valves in your home, including those near individual fixtures and the main water valve. If any of these valves are partially closed, it can restrict the water flow and lead to low water pressure. Ensure all valves are fully open to allow maximum water flow.

Water Heater Issues
Your water heater can also be a factor in low water pressure. A failing water heater might struggle to provide adequate hot water, causing the overall water pressure to drop. Additionally, sediment buildup in the water heater can reduce its efficiency and negatively impact water pressure. A plumber can inspect your water heater, flush it if needed, and address any issues to restore proper water pressure.

Municipal Water Supply Problems
In some instances, the cause of low water pressure lies outside your property. Municipal water supply issues, such as main line breaks or routine maintenance, can temporarily lead to reduced water pressure in your home. If you suspect this is the case, contacting your local water utility can provide insight into any ongoing problems.

Experiencing sudden low water pressure can be a perplexing and inconvenient situation for any homeowner. However, by understanding some common reasons behind this issue, you can take proactive steps to restore your home’s water pressure.

While simple fixes like checking for closed valves can be attempted on your own, it’s essential to consult a professional plumbing service like A to Z Statewide Plumbing for a comprehensive evaluation and resolution of low water pressure problems. Their experienced plumbers can accurately diagnose the root cause, whether it’s sediment buildup, leaky pipes, a faulty pressure regulator, water heater issues, or any other underlying problem. With their expertise and state-of-the-art equipment, they can efficiently address the issue and restore your home’s water pressure to its optimal state.

Remember, low water pressure can be a symptom of more significant plumbing issues, so timely intervention by a professional is crucial to prevent further damage and ensure a steady and reliable water supply in your home.

Trending Topics Right Now

This post first appeared on http://www.atozstatewideplumbing.com

Don’t Let Storm Drains Rain on Your Parade: How to Spot a Clogged Storm Drain at Home

Storm drain clogging

As a responsible homeowner, you understand the importance of regular home maintenance. But amidst all the tasks, one crucial aspect that often gets overlooked is the storm drain system. A clogged storm drain can lead to significant problems, such as water damage, flooding, and even property damage. In this article, we will guide you through the signs to look out for to know if your storm drain is clogged, helping you prevent potential disasters and protect your property.

Pools of Water
One of the most noticeable signs of a clogged storm drain is the presence of standing water around your property. After a heavy rainfall, take a walk around your house and look for any pooling water near the drain openings. If you notice stagnant water even several hours after the rain has stopped, it’s likely that your storm drain is clogged.

Gurgling Sounds
While you might not be able to visually detect a clog, you can often hear it. If you notice unusual gurgling sounds coming from your storm drain or nearby pipes during heavy rain or when using household fixtures, it could indicate a blockage. These sounds occur when water struggles to flow smoothly through the restricted drainage system.

Foul Odors
A clogged storm drain can create an unpleasant odor around your property. Stagnant water, debris, and organic matter trapped in the drain can emit a foul smell, indicating that your drainage system needs immediate attention.

Slow Draining
Next time you experience heavy rain or when watering your garden, observe how water behaves around your property. If you notice water taking longer to drain away than usual, it might suggest that your storm drain is partially or fully clogged. Slow drainage can result from various debris, leaves, or even small objects blocking the drain.

Visible Debris
Another telltale sign of a clogged storm drain is the accumulation of debris and litter around the drain openings. During dry weather, take a quick look around your property’s storm drains and see if there are any visible signs of blockages. If you spot leaves, twigs, trash, or any other debris around the drain, it’s time to take action.

Basement Flooding
A severely clogged storm drain can cause water to back up and find its way into your basement or lower levels of your home. Basement flooding is a severe consequence of a neglected storm drain, and it can lead to costly repairs and potential damage to your belongings.

Don’t underestimate the importance of a well-maintained storm drain system. By being vigilant and proactive, you can prevent potential disasters and protect your property from water damage and flooding. Keep an eye out for pooling water, gurgling sounds, foul odors, slow draining, and visible debris around your storm drains. If you notice any of these signs, it’s essential to address the issue promptly.

While some homeowners may attempt to clear minor clogs themselves, it’s often best to enlist the services of professionals like A to Z Statewide Plumbing. With expertise and specialized equipment, we can efficiently and safely unclog your storm drain, ensuring your home remains safeguarded during heavy rains and storms.

Regular maintenance of your storm drain system is also crucial to prevent clogs from occurring in the first place. Schedule routine inspections and cleanings to keep your drains clear and functioning optimally. Remember, a little prevention can go a long way in preserving your home’s value and protecting your peace of mind.

Trending Topics Right Now

This post first appeared on http://www.atozstatewideplumbing.com

Should I Turn My AC Off When I Go On Vacation?

Summer is the season for vacations, and it’s a time when many homeowners face the dilemma of whether to turn off their air conditioning (AC) while they’re away. While it may seem like a good idea to save some money by turning off your AC while you’re on vacation, there are several factors to consider before making that decision. In this blog, we’ll discuss the pros and cons of turning off your air conditioner when you go on vacation.

Pros of Turning Off Your AC When You Go On Vacation:

1. Energy Savings

Turning off your air conditioner while you’re away can help you save energy and reduce your utility bills. You won’t be cooling an empty home, which can significantly reduce your energy usage.

2. Extended Lifespan of Your AC Unit

When you turn off your air conditioner, it gets a much-needed break from constant usage. This break can help extend the lifespan of your AC unit.

3. Less Wear and Tear

By turning off your AC while you’re away, you’re reducing the wear and tear on the unit, which can help it last longer.

Cons of Turning Off Your Air Conditioner When You Go On Vacation:

1. Mold and Mildew Growth

When you turn off your air conditioner, the humidity levels in your home can rise, leading to the growth of mold and mildew. These can cause health problems for you and your family.

2. Temperature Extremes

Turning off your air conditioner can lead to extreme temperature fluctuations in your home. If the temperature gets too hot, it can damage your furniture, electronics, and other belongings. Especially if you live here in Arizona, you know just how sweltering the summers get here. Keep this in mind before deciding to turn off your AC unit.

3. Increased Energy Usage

If you turn off your AC and then turn it back on when you return, it can cause your AC to work harder to cool your home, resulting in increased energy usage and higher utility bills.

Tips for Using Your Air Conditioner While on Vacation

You don’t have to turn your AC unit completely off while you’re away. In fact, there are still some things you can do to keep it on just enough to keep your home safe and comfortable upon your return. Whether you’re planning to be gone for a few days or a few weeks, here are some tips for using your AC while on vacation.

1. Raise the Temperature

If you’re going to leave your AC on while you’re away, consider raising the temperature ever so slightly to reduce energy usage. You can also invest in a programmable thermostat that allows you to set the temperature higher during the day and lower at night.

2. Use a Smart Thermostat

A smart thermostat can help you manage your AC while you’re away. You can set it to turn on a few hours before you return home, so your home is cool when you arrive.

3. Keep the Air Circulating

If you’re turning off your AC while you’re away, keep the air circulating by leaving ceiling fans on. This can help reduce the risk of mold and mildew growth.

4. Consider Hiring a House Sitter

If you’re concerned about temperature extremes and mold growth, consider hiring a house sitter who can monitor the temperature and humidity levels in your home while you’re away.

Cool Touch Is Here For All Your AC Needs In the Phoenix and Prescott Valley Metropolitan Areas

Turning off your air conditioning unit when you go on vacation can help you save energy and reduce your utility bills. However, it can also lead to temperature extremes, mold growth, and increased energy usage when you return. Ultimately, the decision to turn off your AC when you go on vacation will depend on your personal preferences and circumstances. At Cool Touch, we recommend that if you live in the Phoenix and Prescott Valley area, you keep your AC on but just raise the temperature slightly while away. Temperature extremes can really do some damage otherwise. For all your AC maintenance, repair, replacement and installation needs, consult an HVAC technician at Cool Touch today. Contact us here.

The post Should I Turn My AC Off When I Go On Vacation? appeared first on Cool Touch Air Conditioning & Heating.

This post first appeared on https://www.thetrustedplumber.com

How to Install and Replace Pipes for Plumbing

Installing and replacing plumbing pipes is an essential skill for homeowners, DIY enthusiasts, and professional plumbers. In this guide, we’ll take you through the steps to successfully install and replace pipes for your plumbing system.

8 Steps to Install and Replace Pipes for Plumbing:

1. Turn off the water supply.

Before starting any pipe installation or replacement, make sure to turn off the water supply to avoid any potential mess or damage. Locate your home’s main shutoff valve and turn it off. If you cannot find it, contact your local utility company for assistance. Turning off the water supply is a critical step in the pipe installation or replacement process. Neglecting to do so can result in a number of problems, such as water leakage, flooding, and damage to your property. Additionally, working with an active water supply can make it difficult to properly install or replace pipes, as the water flow can interfere with the placement and sealing of connections. In some cases, failure to shut off the water may even cause personal injury if high-pressure water suddenly sprays out during the procedure. Taking the time to locate and turn off the main shutoff valve ensures a safer, cleaner, and more efficient plumbing project.

2. Determine the type of pipe.

Identify the type of pipe you need to install or replace by checking the existing plumbing system. The most common types are PVC, copper, PEX, and galvanized steel. Each has its advantages and disadvantages, so choose the one that best suits your needs and budget. Understanding the type of pipe you’re working with and selecting the appropriate replacement material is crucial for a successful plumbing project. Using the wrong type of pipe can lead to a variety of consequences, such as leaks, decreased water pressure, or even contamination of your water supply.

If you don’t take the time to identify the correct pipe type and choose a suitable replacement, you may face costly repairs and potential health hazards in the long run. Incompatible materials can cause reactions that weaken pipe joints, making them susceptible to failures and leaks. Additionally, some materials may not be suited for specific water temperature or pressure requirements, leading to premature wear and decreased efficiency of your plumbing system. By taking the time to accurately determine the type of pipe needed, you can ensure a long-lasting and reliable plumbing system that safeguards your home and your health.

3. Measure and cut the pipe.

Measure the length of pipe you need to install or replace and use a pipe cutter or hacksaw to cut the pipe to the desired length. When using a pipe cutter, make sure to rotate the cutter around the pipe while applying pressure to achieve a clean, straight cut. Measuring and cutting the pipe accurately is a vital step in the pipe installation or replacement process. If you fail to do this correctly, you may encounter several issues that can lead to costly repairs and reduced efficiency of your plumbing system. Inaccurate measurements can result in pipes that are too short or too long for your intended installation, leading to improper connections and potential leaks. Moreover, an uneven or rough cut can hinder the effectiveness of pipe joints and fittings, which may also result in leakage or decreased water pressure.

Incorrectly cut pipes may also require additional time and effort to correct the issue, possibly delaying the completion of your plumbing project. In some cases, you may even need to purchase new pipes and fittings if the errors are too severe. Therefore, taking the time to measure and cut your pipes with precision is crucial to ensure the success of your plumbing project and to avoid unnecessary expenses and complications.

4. Prepare the pipe ends.

For copper pipes, use a deburring tool or fine-grit sandpaper to remove any burrs on the cut ends of the pipe. For PVC and PEX pipes, use a chamfering tool to create a beveled edge on the pipe ends. This will ensure a better fit and seal when connecting the pipes. Preparing the pipe ends properly is crucial for the success of your plumbing project, as it directly impacts the effectiveness of the connections and the overall integrity of your plumbing system. If you neglect to prepare the pipe ends correctly, several issues may arise that can lead to costly repairs and potential damage to your property.

Failing to deburr or chamfer the pipe ends can result in poor connections between pipes and fittings, as the uneven surfaces may not create a tight seal. This can lead to leaks that may cause water damage to your home, encourage mold growth, and waste valuable resources. Additionally, improperly prepared pipe ends can cause increased friction and turbulence within the plumbing system, reducing water flow and pressure. This may result in decreased efficiency and performance of your household appliances, such as your washing machine, dishwasher, and showerheads.

Moreover, improperly prepared pipe ends can also contribute to the premature failure of pipe joints and fittings, requiring more frequent replacements and maintenance. This not only increases the overall cost of your plumbing system but also poses a higher risk of sudden leaks and water damage.

5. Connect the pipes.

Depending on the pipe material, different fittings and connection methods will be required:

1. PVC – Apply primer to the pipe ends and inside the fittings, followed by PVC cement. Press the pipe into the fitting and hold for a few seconds to create a strong bond.

2. Copper – Slide a coupling onto the pipe end, followed by a layer of flux. Use a propane torch to heat the joint and apply lead-free solder to create a watertight seal.

3. PEX – Insert a PEX fitting into the pipe end and use a crimping tool to secure the connection with a crimp ring.

4. Galvanized steel – Use pipe thread compound on the threads of the pipe and fittings, then tighten the connection using a pipe wrench.

5. Test for leaks: After installing or replacing the pipes, turn the water supply back on and check for leaks. If any leaks are detected, turn off the water supply and tighten the connections or reapply sealant as needed. Once no leaks are present, your new plumbing pipes are successfully installed.

6. Secure the pipes: Use pipe hangers, straps, or brackets to secure the pipes to your home’s structural elements. This will minimize vibrations and noise, as well as help prevent damage to your plumbing system.

7. Insulate pipes if necessary: In colder climates, it is essential to insulate exposed pipes to prevent freezing and potential damage. Use foam pipe insulation or pipe wrap to cover the exposed pipes, securing it with duct tape or zip ties.

By following these steps, you can successfully install and replace pipes for your plumbing system. Remember to always follow local building codes and consult a professional plumber if you are unsure about any aspects of the process.


Top 6 Ways To Improve Your Indoor Air Quality This Summer

As the summer season arrives, we tend to spend more time indoors, seeking respite from the heat – especially here in Arizona. However, have you ever considered the quality of the air you breathe within the confines of your home? Indoor air quality plays a vital role in our overall health and well-being. Poor air

CONTINUE READING »

The post Top 6 Ways To Improve Your Indoor Air Quality This Summer appeared first on Wolfgangs Cooling, Heating & Plumbing.

This post first appeared on https://www.thetrustedplumber.com

Cut Your Cooling Costs With These AC Tips

calculating-money-saved-with-a-more-efficient-home

The majority of household energy use over the course of the year is put toward heating and cooling. Anything you can do to make cooling your home more efficient will save you money when your electric bill is due. So what can you do to lower your cooling costs? Try these helpful tips to maximize your air conditioning and stay cool and comfortable for less.

Seal Up Drafts

Any cracks that allow air to pass through will let hot air into your home during the summer, giving your air conditioner more work to do. If you have gaps under any exterior doors, consider adding a draft stopper, which is easily found at a hardware store for around fifteen bucks. Or you can use a door snake, a simple tube filled with sand that will block the gap when the door is closed. Spaces around windows can be sealed with caulk or foam weather stripping. 

Consider the Sun

When direct sunlight hits a window, the glass magnifies the heat, which is how greenhouses keep plants warm and growing all winter. You don’t want that happening in your house during the summer! Pay attention to which windows the sun is hitting at different times of day and make sure they are covered. Insulated curtains are the best, but any curtains or blinds will help.

Use Your Ceiling Fans

While a fan in an empty room is just a waste of energy, a ceiling fan helping to circulate the air in an occupied room will cool you off dramatically. Every molecule of air that touches your skin carries a bit of your heat away with it. Moving air means more molecules will brush against you and more heat will be carried away. The house will be the same temperature, but your body will be much cooler.

Raise the Thermostat

Once you’ve taken the other steps, you should be able to raise your thermostat quite a bit and still feel just as cool. This will take a lot of pressure off your AC unit, not only cutting your energy costs but also prolonging the life of the air conditioner as it will experience less wear and tear. Keep nudging the temperature up a couple of degrees until you find the setting that will keep you comfortable while allowing the air conditioner to run less of the time.

Program the Thermostat

A programmable thermostat can be set to use much less energy while you’re away from home. Keeping your home ten degrees warmer during the workday will cut your electric bill, and the programming will allow it to cool the house down right in time for you to arrive home. Don’t forget to program it for any vacations or other times when you’re away from home longer than usual. And even if you don’t have a programmable thermostat, it’s worth raising the temp before you leave home and lowering it again when you return. 

If you have questions about your air conditioning, there’s no need to type heating and cooling near me in Cedar Grove, NJ into a search engine. Come straight to us! We’re always happy to help.

Contact MarGo Plumbing Heating Cooling Inc. today to get prompt assistance with your air conditioner!

The post Cut Your Cooling Costs With These AC Tips first appeared on MarGo Plumbing Heating Cooling Inc..

This post first appeared on https://margoplumbing.com

What Tools Are Used for a Sewer Line Inspection?

plumbers conduct sewer line inspection

It takes a bit more than a keen eye to get a good look at the quality of an underground sewer pipe. Sewer pipe maintenance requires not only a skilled worker, but also the ability to accurately view damages in a manner that keeps everyone on the team safe. 

To thoroughly inspect an underground sewer pipe, you can rely on a team of certified plumbers. Those who have received a certification from NASSCO’s Manhole or Pipeline Assessment Certification Programs are trained in safely conducting inspections. This requirement ensures that all inspections are consistent and conducted at a high level of quality. Additionally, plumbers with this certification are qualified and highly skilled to use the technical equipment needed for a thorough inspection.  

About Technical Sewer Inspections

The main objective of a sewer line inspection is to gather visual information to assess the quality of the interior of the system’s pipes. Sewers transport wastewater and runoff from Sacramento homes and businesses out to treatment plants. Since these sewer lines see a lot of use, they require regular upkeep to ensure that they are properly moving waste away from the city. If you’re thinking about buying a home, it’s also a good idea to conduct a sewer inspection to ensure that the structural integrity of the underground pipelines are intact. 

During an inspection, a plumber may be looking for a few different things. First, an inspection is necessary for routine maintenance. Just like how you take your car into the shop regularly, the sewer pipes in Sacramento also need to be proactively inspected. Even if there are no obvious signs of damage, you never know what you might find if you haven’t conducted an inspection in a long time. 

In conjunction with regular maintenance inspections, regular cleaning will reduce the normal wear and tear seen on the inside of sewer pipes. Of course, with any sewer line there is a large amount of wastewater that travels through the network of pipes so some blockage or minor damage is normal to find during an inspection. That being said, regular cleanings and inspections can extend the lifespan of sewer lines. 

The next reason a municipality may need a sewer inspection is to resolve sewer line damage that may be hazardous to the surrounding people and properties. This includes a blocked sewer or backflow of wastewater. With an inspection, plumbers will be able to identify the source of the issue and resolve it before the problem becomes worse. 

Tools Used For Sewer Line Inspections

Conducting a sewer inspection is no easy task. However, there are tools available to make the process as seamless and safe as possible for both plumbers and nearby pedestrians. Let’s dive into some common tools and equipment needed for a thorough sewer line inspection. 

Locator Device

To conduct a sewer inspection, plumbers first need to know where the pipe is. Using a magnetic device, plumbers can determine the location of a pipe based upon its magnetic field. Usually these sensors are placed about eight feet apart and detect the difference in the magnetic field between them. 
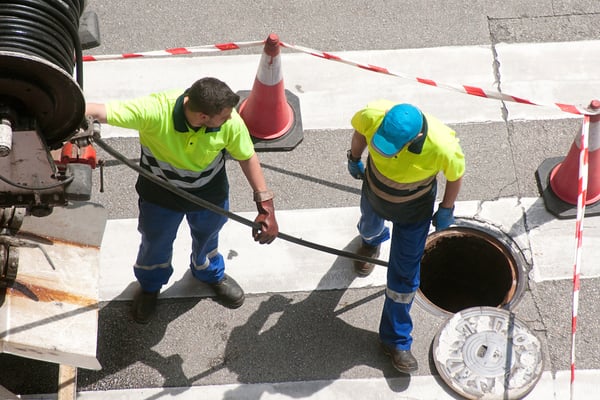
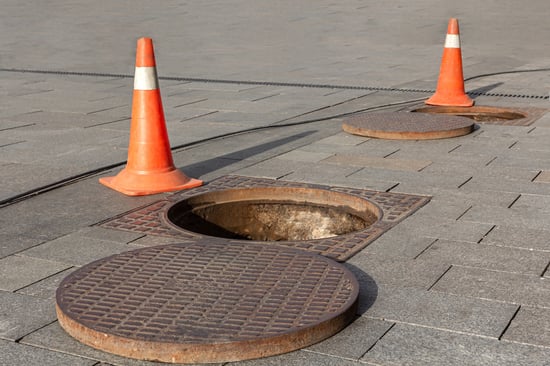
Manhole Hook

To enter the sewer pipe, the manhole needs to be removed. These steel pieces are very heavy, so it’s always useful to have a bit of assistance. Plus, hooks ensure that the manhole cover is removed safely before beginning a sewer line inspection. 
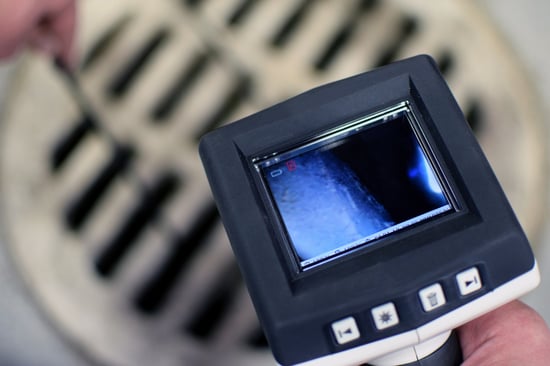
Cameras

An excellent way to conduct an inspection is with a camera. This allows for projects to be conducted from above ground, instead of digging up sewer lines. With a camera, the inspection process can be conducted safely and effectively. Plus, these tools are also useful for trenchless pipe repair projects. There are several camera options that a municipal plumber might choose to use, depending on the application needed. 

sewer line inspection with a camera

Pole Cameras

An easy way to view the interior of sewer lines is with a small camera mounted to a pole. This camera offers limited mobility as the pole is unable to maneuver around curves, though it can be useful when a sewer line is too damaged for a plumber to safely enter. 

Crawler Cameras

A crawler camera is a device that is remotely controlled to travel along the bottom of a sewer line. Depending on the wheels used, the crawler can traverse over obstacles and find damages. With the camera attached, an inspection team can view any of these defects and report on detailed images captured by the device. Again, these cameras allow for safe viewing of damaged areas that are hard to access. 

Push Cameras

A push camera is frequently used to view lateral lines and drain pipes. A camera that is attached to the end of a long cable is pushed through a sewer line to inspect any damages. At the other end of the cable, plumbers can view the images taken by the camera and displayed on a small computer screen.

Push cameras have more flexibility than pole cameras, though the angle of viewing might be difficult to adjust. With this type of camera, inspections can be completed quickly and safely for both small-scale projects and larger municipal pipe viewing needs. 

Gas Monitors

To ensure a safe inspection, plumbers use gas monitoring equipment before removing a manhole cover. A gas monitor can detect methane and hydrogen sulfide near the opening of a sewer line and allow for plumbers to take necessary precautions. 

These gasses can cause significant damage to the surrounding area and personnel if there is a spark nearby. So, detecting the gas before beginning an inspection process is a necessary procedure to ensure everyone is safe. 

Safety Equipment

It’s important that all plumbers prioritize safety on the job. This includes using street cones, flags, hard hats, reflective vests, and more to ease the threat of hazards while working. These items can keep cars and pedestrians away from hazardous zones while keeping the plumbers visible and protected. 

What to Expect During a Sewer Inspection

Before a team of plumbers comes in to conduct a sewer line inspection on your property, you should probably have an understanding of what they’ll be doing. The goal of this inspection is to find the source of any known problems and also identify any existing ones that may have gone under the radar. 

During the inspection, a plumber will use the equipment listed in this article to view the interior of sewer pipes on your property. For residential lateral lines, they will likely use a simple pole or push camera to get a good look at the sewer pipe. With this camera, the plumber will keep an eye out for root intrusion, cracks, clogs, and corroded materials. 

The process is very similar for municipal sewer line inspections. The key difference here is the equipment used will likely be more sophisticated. For larger pipes, it’s common for plumbers to use a crawler camera to have more flexibility when covering a greater surface area. 

In the past, plumbers would have to enter the large sewer pipes themselves after removing the manhole cover. This made the work very difficult and quite dangerous due to the low lighting and small area to work in. With advanced cameras, inspection teams are able to get a much more detailed view of sewers and record thorough data. 

safety cones around manhole for sewer line inspection

Hire Sacramento Professional Plumbers for Sewer Line Inspections

Regular sewer line inspections ensure that the waterways in Sacramento stay safe for residents, businesses, and visitors. While you may not think twice about sewer lines, it’s critical that they are well maintained to keep this city running smoothly.

For all sewer line needs, you can count on the certified plumbers at Express Sewer & Drain for detailed inspections and repair services. We specialize in trenchless technology to ensure that all projects are completed safely and with a close attention to detail. If you’re looking for a team to conduct an inspection, reach out to us today!

Pipe Bursting Special Sacramento

This post first appeared on https://www.expresssewer.com

+1-877-959-3534