Month: August 2024

Tackling Low Water Pressure: Understanding Signs, Causes and Solutions

As experienced plumbing professionals, we understand the inconvenience and frustration caused by low water pressure in your home. A weak shower stream or trickling faucet not only hampers your daily activities, but can also indicate underlying issues within your plumbing system. Therefore, addressing low water pressure is essential to ensuring comfort and efficiency in your household.

In this comprehensive guide, we’ll identify the signs of low water pressure, discuss the potential causes, and explore practical solutions to restore your home’s water flow to its optimal level.

Identifying Low Water Pressure Issues

To begin addressing low water pressure issues, it is crucial to understand and recognize the signs that indicate a problem. Some common indicators of low water pressure include:

  1. Weak shower flow: A reduced or inconsistent water flow in your shower can severely impact your daily routines and overall comfort.
  2. Slow-filling appliances: If appliances like your dishwasher or washing machine are taking longer than usual to fill with water, low water pressure may be the culprit.
  3. Trickling faucets: If your faucets are incapable of providing a steady, uninterrupted flow, it could indicate low water pressure or other plumbing issues.

Once you’ve observed these signs, you can move on to investigating the causes of low water pressure in your home.

Understanding the Causes of Low Water Pressure

Low water pressure can arise due to various factors, each with its own distinct solution. Some potential causes of low water pressure include:

1. Clogged Pipes and Fixtures

Sediment buildup or mineral deposits within your pipes can restrict water flow, causing low water pressure. Similarly, dirt and debris can accumulate within plumbing fixtures, such as faucets and showerheads, resulting in less water reaching its destination.
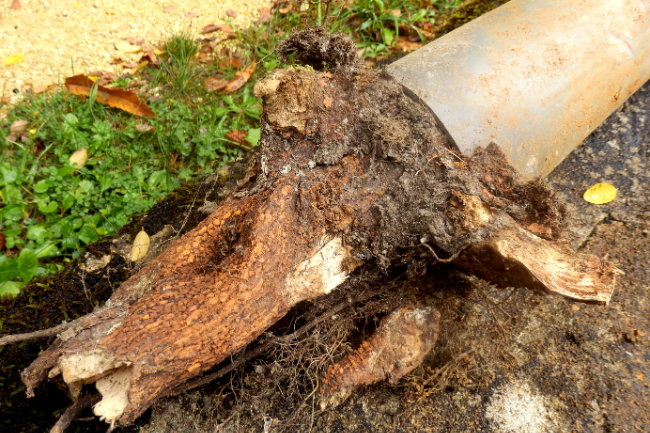
2. Pipe Corrosion

Over time, metal pipes can corrode, causing the inner pipe diameter to shrink and restrict water flow. This issue is more prevalent in older homes with galvanized steel or copper pipes which are more susceptible to corrosion.

3. Water Leaks

If there is a leak in your plumbing system, water may escape before reaching your faucets or appliances, resulting in low water pressure.

4. Pressure Regulator Issues

Pressure regulators are responsible for maintaining consistent water pressure in your home. If a regulator malfunctions, it can lead to low or inconsistent water pressure.

5. Water Supply Issues

Sometimes, the cause of low water pressure can be traced back to the municipal water supply. Factors such as high water demand or issues with the local water treatment plant can impact water pressure levels.

Effective Solutions for Low Water Pressure Problems

Once you’ve identified the possible cause of your low water pressure, you can explore various solutions to restore optimal water flow. Some effective strategies include:

1. Addressing Pipe and Fixture Clogs

For clogged fixtures, start by removing your faucet’s aerator or showerhead to clean out any sediment buildup. If your pipes are clogged, professional pipe cleaning methods, such as hydro jetting or snaking, can effectively remove blockages and restore water flow.

2. Replacing Corroded Pipes

If corroded pipes are causing your low water pressure issues, consider replacing them with modern materials like PEX or PVC pipes, which are more resistant to corrosion and have a longer lifespan.

3. Fixing Water Leaks

Identify and repair leaks in your plumbing system to restore water pressure. This may require the help of a professional plumber, who can pinpoint the exact location of the leak and carry out proper repairs.

4. Inspecting and Adjusting Pressure Regulators

If your pressure regulator is malfunctioning, it may need to be adjusted or replaced. Consult with a licensed plumber to determine the best course of action and ensure proper installation of a new regulator if necessary.

5. Communicating with Your Water Provider

If the issue of low water pressure originates from your municipal water supply, coordinate with your water provider to investigate the problem and implement appropriate solutions.

Empower Yourself to Resolve Low Water Pressure Concerns

Low water pressure in your home can be a frustrating issue, but by understanding the signs, causes, and solutions, you can take control and improve your plumbing experience. No matter the root of the problem, rest assured that our team of dedicated plumbing professionals is ready to help you tackle any low water pressure challenge and restore your home’s water flow to optimal levels. With The Irish Plumber’s expert plumbing services, you’ll be well-prepared to address and resolve your residential water pressure concerns for a smooth and efficient plumbing experience.

How To Change The Fill Valve In Your Sacramento Toilet

fill_valve_featured_image

Are you tired of dealing with a constantly running or leaking toilet in your Sacramento home? The culprit may be a faulty fill valve. While it may seem like a daunting task, changing the fill valve in your toilet is actually a simple and straightforward process.

In this blog post, we will guide you through the steps to successfully replace your fill valve and restore your toilet’s proper functioning. Say goodbye to annoying leaks and wasted water, and hello to a more efficient and functional toilet. Let’s dive in!

What Does a Fill Valve Do?

A fill valve is a crucial component of your toilet’s flushing system. It is responsible for controlling the flow of water into the toilet tank, which is necessary for a proper flush. The fill valve works by automatically detecting when the water level in the tank is low and then refilling it to the appropriate level. This ensures that there is enough water for a strong and effective flush every time you use your toilet. 

Without a functional fill valve, you may experience weak or incomplete flushes, leading to potential clogging or constantly having to manually refill the tank. Therefore, it is essential to keep your fill valve in good working condition to maintain a fully functioning toilet.

Why You Should Replace a Faulty Fill Valve

A faulty fill valve in a toilet can lead to a variety of problems that can greatly inconvenience the homeowner. The fill valve is responsible for refilling the toilet tank with water after each flush, and if it is not functioning properly, it can cause issues such as constantly running water, low water levels, or even complete failure to refill the tank. This can lead to wasted water and higher utility bills, as well as potential damage to the toilet’s components. 

Additionally, an ineffective fill valve may also result in inconsistent flushing and a noisy toilet, making it uncomfortable for both residents and guests. Therefore, it is crucial to address any faults in the fill valve promptly to avoid further complications and ensure a functional and efficient bathroom experience.

13 Steps for Replacing Your Toilet’s Fill Valve

toilet_flapper

A faulty fill valve can cause your toilet to run, wasting valuable water and money. Replacing the fill valve is a simple, inexpensive home toilet repair you can do yourself. Just follow these steps to replace your fill valve and get your toilet back to normal.

  1. Turn off the water to your toilet by turning the shut-off valve clockwise.
  2. Next, remove the toilet lid from the tank.
  3. Remove the refill tube from the overflow pipe.
  4. Flush the toilet to drain the water from the tank. Hold down the handle until most of the water has drained. Then use a towel or sponge to remove the rest of the water from the tank.
  5. Locate the water supply tube or hose below the tank and disconnect it from the fill valve. You may need pliers or a wrench to loosen the connection.  
  6. Then, loosen the lock nut that holds the fill valve to the tank.  
  7. Lift the old fill valve out of the tank.
  8. Prepare the new fill valve by slipping on the rubber washer, flat side up, and adjusting the height of the fill valve. The fill valve should be slightly taller than the overflow tube.
  9. Insert the new fill valve in the hole at the bottom of the tank, making sure the nipple faces the overflow tube.  
  10. Re-tighten the lock nut underneath the tank and reattach the water supply tube or hose.
  11. Attach one end of the fill tube to the fill valve nipple, and clip the other end to the overflow pipe.
  12. Turn the shut-off valve counterclockwise to turn the water to the toilet back on.
  13. Test the new valve by flushing the toilet. Make sure the tank refills properly and check for leaks below the toilet.

Get Help With Your Fill Valve From the Expert Sacramento Plumbers

If you need help with this or any other plumbing projects, call Express Sewer & Drain. Our skilled Sacramento plumbers will gladly answer your questions and make any necessary repairs.

Dealing With Common Plumbing Problems

This post first appeared on https://www.expresssewer.com

How much does Trenchless Sewer Repair Cost in California?

cost_of_trenchless_repair

Whether your sewage system has cracks in it or is severely damaged, trenchless repairing methods use advanced technology to render poor functioning sewage systems back to new. If you are deciding which professional plumbing company to use, you may want to look into one that can repair fractured pipes using trenchless technology.

Let’s talk more about trenchless sewer repair and the how it can save you more money in the long run. 

What is Trenchless Sewer Repair?

Trenchless sewer repair is a modern marvel in the world of plumbing, offering a cost-effective and efficient solution to damaged sewage systems. By utilizing advanced technology, trenchless methods can restore cracked or broken pipes without the need for extensive digging and disruption to your property.

The cost of trenchless repair may initially seem higher than traditional methods, but when you factor in the expenses associated with re-landscaping, extended repair times, and material limitations, trenchless technology emerges as the more economical choice. With options like pipe lining and pipe bursting, trenchless repair can be tailored to suit the specific needs of your sewage system, providing a durable and long-lasting solution.

Consulting with a professional plumber can help determine if trenchless sewer repair is the right option for you, ensuring a smooth and efficient restoration of your sewage system.

Cost Factors of Trenchless Sewer Repair

manhole_to_manhole_trenchless_sewer_repair

The total cost of repairing a damaged sewage system with trenchless technology is far less than the alternative traditional methods. There are still some factors that affect the cost of pipe repair or replacement, such as:

  • The length of pipe being restored
  • Pipe depth
  • The extent of damage
  • Trenchless pipe repair or replacement technique used
  • Pipe location on your property

The aforementioned factors are far less in financial comparison than the factors to consider with traditional sewage repairs including:

  • The cost of re-landscaping
  • The repair or replacement time
  • Evacuating your home and stay in a hotel for an extended period of time
  • Rapid expiration of repair and replacement materials used

Depending on the type of repair or replacement you are having done to your sewage system, trenchless technologies may appear the more expensive option at the time; however, when you get down to the cost of everything involved in traditional repairs and replacements, trenchless technology repairs are generally more cost effective.  

Below are a few things to think about when evaluating the cost of sewer repair.

Traditional Sewer Repair Methods

For small repair jobs, this replacement can cost between $50- $250 per foot. This can leave a large dent of about $3,000- $6,000 in your wallet or even $5,000- $13,000 for repairs over 50 feet. Don’t forget about the associated expenses of traditional repair methods you will have to cover as well; this includes any relandscaping, road closures and labor costs.

Pipe Lining or Pipe Bursting

Plumbing professionals and leaders of trenchless technology will evaluate the extent of damage your sewage pipes are experiencing and then determine whether to proceed with pipe lining or pipe bursting techniques.

Pipe bursting can cost anywhere from $60- $200 per foot, which can end in about $3,500- $20,000 for an entire repair. This trenchless technique is used for pipe replacement and is dependent on the length and depth of your current pipe.

Pipe Lining is another trenchless technology and relines your damaged lateral or sewer pipe. This technique can cost anywhere from $80- $250 per foot but averages about $160 per foot.

For more standard repairs, the cost varies from $4,000-$20,000; most homeowners pay about $6,000-$12,000 for major sewer connection repairs. For small-scale pipe lining applications, such as pipe repair less than 50 feet long, your damaged pipeline can be completed for about $3,000- $4,000 depending on the pipes location and depth.

Thinking of Going Trenchless?

Trenchless technologies have many benefits, but they also have their place. Trenchless technology might not be right for your specific sewage need. Knowing the costs and benefits of trenchless technology and consulting with a professional plumber will help determine what your trenchless sewer repair cost would be and whether it is the right option for you.

Sp

This post first appeared on https://www.expresssewer.com

Expert Tips on Preventing and Fixing Common Kitchen Sink Plumbing Problems

A functional and well-maintained kitchen sink is crucial for carrying out daily tasks in the heart of your home. However, plumbing issues in kitchen sinks can be both troublesome and inconvenient, causing disruptions in your daily routine. In this article, we will explore common kitchen sink plumbing problems, outline useful preventative measures, and provide practical DIY solutions. Additionally, our skilled team at The Irish Plumber will be available to assist with more complex repairs and maintenance for your kitchen sink plumbing.

Issues with kitchen sink plumbing can range from simple to more complicated scenarios. These problems can result from factors such as poor installation practices, inadequate maintenance, or the natural wear and tear of plumbing fixtures. By familiarizing yourself with the common issues and their causes, you can better address them when they arise and prevent them from escalating into significant problems. Read on to discover our expert advice on understanding, preventing, and resolving common kitchen sink plumbing issues, and learn how we can help keep your kitchen in top shape, ensuring a smooth and worry-free experience in your home.

Identifying Common Kitchen Sink Plumbing Problems

Understanding the most common kitchen sink plumbing issues can help you diagnose problems quickly and accurately. Some of the typical problems you may encounter include:

  1. Clogged Drains: Accumulation of food particles, grease, and other debris can lead to blockages in kitchen drains, resulting in slow water flow or standing water in the sink.
  2. Leaky Faucets: Faulty seals, worn-out cartridges, or corroded valves can cause your kitchen faucet to leak, wasting water and potentially damaging countertops or cabinets.
  3. Low Water Pressure: Insufficient water pressure in your kitchen sink can be due to mineral buildup in the faucet aerator or more severe issues such as water supply problems or damaged pipes.
  4. Garbage Disposal Issues: Overloading your garbage disposal or putting inappropriate items down the drain can result in jams, clogs, or even motor failure.

Effective Prevention Measures

Adopting proactive measures can help prevent kitchen sink plumbing issues and keep your system running smoothly. Consider implementing the following practices:

  1. Use a Sink Strainer: Installing a sink strainer can help capture food particles and prevent them from entering your drainage system, reducing the risk of clogs.
  2. Dispose of Grease Properly: Instead of pouring fats, oils, and grease down the sink, collect them in a container and dispose of them in the trash to prevent drain blockages.
  3. Regular Faucet Maintenance: Periodically check your faucet for signs of wear or corrosion and replace any damaged parts to prevent leaks and low water pressure.
  4. Garbage Disposal Care: Ensure you only put suitable items in your garbage disposal and run cold water while it’s in operation. Regularly clean your disposal by using an appropriate cleaner and allowing it to run for a short duration.

DIY Solutions for Common Kitchen Sink Plumbing Issues

Some kitchen sink plumbing problems can be resolved with simple at-home fixes. Here are some basic DIY solutions for common issues:

  1. Clearing Clogged Drains: For minor clogs, use a plunger to dislodge any blockages. Alternatively, you can try a mixture of baking soda and vinegar followed by hot water to break down debris. Avoid using harsh chemical drain cleaners, as they can damage your pipes over time.
  2. Fixing Leaky Faucets: Turn off the water supply to your faucet, disassemble it, and examine the individual parts for wear or damage. Replace any faulty components and reassemble the faucet, ensuring a proper seal and fit. If the leak persists, consider consulting a professional plumber.
  3. Improving Low Water Pressure: Unscrew and clean the faucet aerator to remove mineral buildup that may be affecting the water flow. If the issue persists, contact a plumber to inspect your home’s water supply and plumbing system for more severe problems.
  4. Troubleshooting Garbage Disposal Issues: If your garbage disposal is jammed, turn off the appliance and use a hex wrench to manually rotate the motor underneath the unit. This action can help dislodge any stuck items and get your disposal working again. If your disposal continues to malfunction, it may be time to call a professional for assistance.

When to Seek Professional Help

While some kitchen sink plumbing issues can be resolved through DIY methods, there are instances when it’s best to reach out to a professional plumber for assistance:

  1. Recurring Clogs: If you experience frequent clogs despite using preventative measures, there may be a deeper issue within your plumbing system that requires professional attention.
  2. Persistent Leaks: When leaks persist even after your attempts to fix them, it may be a sign of more significant problems with your faucet or plumbing that warrant a professional inspection.
  3. Severe Water Pressure Issues: If low water pressure affects multiple fixtures in your home or persists even after cleaning the faucet aerator, you may need expert help to diagnose and resolve the issue.
  4. Garbage Disposal Replacement: If your garbage disposal has failed or requires replacement, a professional plumber can correctly install the new unit and ensure its proper functioning.

Conclusion

By understanding common kitchen sink plumbing problems, adopting effective preventative measures, and applying DIY solutions when appropriate, you can help maintain a functional and efficient sink area in your kitchen. However, when faced with more complex issues, don’t hesitate to seek the help of our experienced team at The Irish Plumber. Our skilled professionals are ready to assist you in tackling any kitchen plumbing challenges, ensuring that your sink remains a reliable and integral part of your home. Reach out today for you much needed plumbing services in Ottawa and more!

Need AC Repair? Try This Troubleshooting Checklist First!

red-pen-checking-off-items-on-a-checklist

Oh, no! Did the air conditioner stop working? Are you going to have to call for AC repair, wait for a technician, and pay a repair bill? Well, maybe. But if you do all that, you want to make sure it is truly necessary. Before you decide you need a technician to look at your air conditioner, run through this quick AC troubleshooting checklist. 

A Word of Warning

Air conditioners are electrical appliances. They contain components that could injure you, cause electric shock, or expose you to chemicals like super-cooled refrigerant. And if anything goes wrong with the wiring, you could be left with a sneaky fire hazard you don’t know you need to worry about. Don’t DIY AC repair! Leave the real work to the experts. But actual repair may not be needed at all.

Check the Power

Is your air conditioner receiving power? A common issue is that if another appliance is plugged into the same circuit as the air conditioner—say, if you use the vacuum in a certain outlet—the circuit can overload and trip. Check your electrical panel. Is one of the circuits switched out of position? Just flip it back, plug the vacuum in somewhere else, and cross your fingers.

If this solves it, fantastic! But don’t just keep going through this process over and over. An air conditioner that repeatedly trips the circuit breaker has an actual problem. It’s drawing more power than it should. Perhaps the motor or the wiring needs repair. Have it checked by a professional!

Check the Thermostat

Whether you have an old dial thermostat, a programmable digital thermostat, or one of the new smart thermostats, it’s possible for the setting to be changed without you realizing it. Whether it’s a minor bump from an elbow or the accidental pressing of the wrong button—or a curious small child pressing buttons on purpose—a change to the thermostat’s setting or programming can tell your air conditioner to stop running.

Make sure it’s set to cool and not off or heat. Make sure it’s set to the temperature you intended to set it to. And check that any sort of “away” programming that would keep your home at a different temperature during certain hours wasn’t accidentally triggered. If your thermostat isn’t displaying anything at all, or it seems that signals are only getting through intermittently, change the batteries.

Change the Air Filter

Something you should already be doing monthly is changing the air filter. If there’s a larger-than-normal amount of dust in your home, you might need to change it more frequently. If it’s too badly clogged with dust, it can set off the limit switch, shutting the system down to prevent overheating. Check the filter before you decide you need actual repair.

If none of these things have resolved your AC issue, it’s time for central air conditioning repair in Cedar Grove, NJ. Now when your technician arrives, you’ll know for sure that you really do need their help.

Contact MarGo Plumbing Heating Cooling Inc. today with AC concerns or any questions about your HVAC system!

The post Need AC Repair? Try This Troubleshooting Checklist First! first appeared on MarGo Plumbing Heating Cooling Inc..

This post first appeared on https://margoplumbing.com

Expert Guide on Choosing the Perfect Toilet for Your Bathroom Renovation

Are you planning to renovate your bathroom and looking for the perfect toilet to complete the space? With so many different styles, types, and features available, choosing the right toilet may seem like a daunting task. However, with a little guidance and understanding of the essential factors to consider, you can make an informed decision that matches your bathroom’s design, functional requirements, and eco-friendly goals. In this article, we will outline essential tips on selecting the ideal toilet for your bathroom renovation, discuss the various types of toilets available, and explain how our skilled team at The Irish Plumber can support your toilet installation and replacement needs.

A toilet may seem like a simple fixture in your bathroom, but choosing the right one can greatly impact the functionality, aesthetics, and sustainability of your space. The process of selecting a toilet should involve careful consideration of factors such as size, style, water efficiency, and flushing mechanism, as well as personal preferences and budget limitations. By understanding the advantages and drawbacks of various toilet types, you can make an informed decision that aligns with your renovation goals and contributes to creating a comfortable and stylish bathroom. 

Read on to discover expert advice on choosing the perfect toilet for your bathroom renovation and learn how our experienced professionals at The Irish Plumber can help with installations and replacements to transform your bathroom into the oasis you’ve always dreamed of.

Understanding Toilet Styles and Types

When selecting a toilet for your bathroom renovation, it’s essential first to familiarize yourself with the different styles and types available. The most common toilet styles include:

  1. Two-Piece Toilets: These toilets consist of a separate tank and bowl that are bolted together during installation. Two-piece toilets are typically more affordable and easier to find replacement parts for, but they may be harder to clean due to the seam between the tank and bowl.
  2. One-Piece Toilets: These toilets feature a seamless design with the tank and bowl constructed as one unit, making them easier to clean and maintain. However, one-piece toilets tend to be pricier than their two-piece counterparts.
  3. Wall-Mounted Toilets: These space-saving toilets are mounted to the wall, with the tank and plumbing concealed behind the wall. Wall-mounted toilets offer a sleek, modern look, but their installation can be more complex and costly compared to traditional floor-mounted toilets.

Assessing Flushing Mechanisms

The flushing mechanism is another crucial factor to consider when choosing a toilet. The most common types of flushing systems include:

  1. Gravity-Feed Flush: This traditional flushing system relies on gravity and water pressure, making it a simple and low-maintenance option.
  2. Pressure-Assisted Flush: This system uses air pressure to forcefully push water into the bowl, resulting in a powerful and efficient flush. However, pressure-assisted toilets can be louder and more expensive than gravity-feed toilets.
  3. Dual-Flush Toilets: These environmentally friendly toilets offer two flush options – a full flush for solid waste and a half flush for liquid waste. Dual-flush toilets help conserve water, making them an excellent choice for eco-conscious homeowners.

Considering Size and Rough-In Dimensions

Before buying a toilet for your bathroom renovation, it’s essential to measure the available space and determine the appropriate rough-in dimensions. The rough-in is the distance from the wall to the centre of the toilet’s drainpipe. The most common rough-in dimension is 12 inches, but 10- and 14-inch options are also available.

Ensure there is adequate space in front of and on either side of the toilet to meet local building codes and provide comfortable access for users. Additionally, consider the height of the toilet bowl, as standard height toilets (15-17 inches) and comfort height toilets (17-19 inches) are available, catering to different preferences and accessibility requirements.

Budgeting and Water Efficiency

Your budget and desire for water efficiency will also influence the type of toilet you choose for your bathroom renovation. High-efficiency toilets (HETs) use less water per flush and can save you money on your water bills over time. Furthermore, some models may qualify for rebates or incentives from local utility providers.

While eco-friendly and high-efficiency toilets are generally pricier than traditional models, investing in a water-saving toilet can reduce your environmental impact and provide long-term cost savings. Additionally, explore options with the WaterSense label, which indicates that a toilet meets the Environmental Protection Agency (EPA) criteria for water efficiency and performance.

The Irish Plumber’s Toilet Installation and Replacement Services

Once you’ve selected the perfect toilet for your bathroom renovation, it’s essential to ensure proper installation or replacement. At The Irish Plumber, our team of skilled professionals offers comprehensive toilet installation and replacement services. Whether you’re upgrading an old toilet or installing a new one, our team will ensure that your fixture is installed correctly, complies with local building codes, and functions optimally. Our services include:

  1. Toilet Removal and Disposal: If you’re replacing an existing toilet, our team will carefully remove and dispose of the old fixture in an environmentally responsible manner.
  2. Proper Sealing and Connections: Our technicians will ensure that the toilet is securely fastened to the floor, sealed correctly to prevent leaks, and connected to the plumbing system with proper fittings.
  3. Flange Repair and Replacement: If necessary, our team will repair or replace the toilet flange – the component that connects the toilet to the drainpipe – to prevent leakage and ensure a secure connection.

Conclusion

Choosing the right toilet for your bathroom renovation is essential for creating a comfortable, stylish, and functional space. By considering factors such as style, flushing mechanism, size, rough-in dimensions, budget, and water efficiency, you can make an informed decision that aligns with your renovation goals and preferences. Trust our experienced Ottawa plumbers at The Irish Plumber to assist with the installation and replacement process, ensuring a seamless and professional transformation of your bathroom.

5 Ways Trenchless Pros Cure Pipes with Interfit Lining

pipe_damage

Expert installation of cured-in-place pipe (CIPP) liners is the least invasive way to restore damaged pipe structures, at a fraction of the costs of traditional repairs. Inferfit lining, which molds to form within existing pipes, makes it easy for homeowners, municipal planners, and building owners to tend to pipe damage in a quick, affordable manner.

Advantages of Interfit Lining

The best pipe lining solutions available in today’s market are those created by Interfit USA. Interfit lining is the industry standard CIPP solution for underground pipe repairs and is now used nationwide to restore severely damaged pipelines, sewer connections, and lateral joints without labor-intensive digging. This means huge time and cost savings for your home or property pipe repair.

There’s no longer any reason to tear apart your lawn during pipe restoration, and manually replace damaged sections with expensive, custom-made pipe sections. Cured-in-place Interfit liners begin as liquid and cure within pipe walls to create durable, long-lasting pipe solutions at minimal cost. Lateral lining solutions through CIPP eliminate digging completely from the pipe repair process.

5 Ways Interfit Lining Cures Pipes

1.) Pipe and Lateral Line Curing

Trenchless technicians use resin-based liners, like those created by Interfit USA, to efficiently cure pipe cracking, corrosion, and other breakages. Full 360°, non-invasive pipe coating allows experts to form new pipe and lateral walls within damaged structures, in a seamless process that takes mere hours.

When compared to the days (or even weeks) of traditional, dig-and-replace pipe renovations, this means instant savings in labor, materials, and landscaping. Beyond short-term savings, lining your damaged laterals and underground pipes with Interfit lining provides assurance for decades of future use.

Once cured within pipe walls as a single-bodied, lipless repair segment, lateral lining pipes are guaranteed to perform for at least half a century to come.

2.) Sectional Point Repairs for Contained Pipe Damage

tree root in pipe

Trenchless pros use liquid-based, resin liners to do more than pipe repair alone; they can also use liners to repair localized pipe damage with ease. This is ideal for applications where damage is isolated to a single, contained pipe segment, or one-time natural breakages, including:

  • Root intrusion
  • Burrowing activity from wildlife
  • Faulty installation
  • Isolated fracturing
  • Weathering and temperature change cracking
  • Accidental puncturing

Sectional repairs are perfect for tending to pipe damages where full lining application would be impractical. If your pipes are failing due to a single crack or intrusion, you don’t need to waste extra money on replacing your entire pipe; sectional point repair makes it easy to resolve single-instance pipe damage in an affordable, non-intrusive way.

3.) Municipal Manhole-to-Manhole Sewer Lining

Another way trenchless technicians use Interfit solutions every day is in the repair of municipal sewer lines. Trenchless lining provides lucrative benefits beyond home pipe repairs; city planners and municipal sewer workers take advantage of trenchless technologies every year to restore manhole lines in an affordable, non-disruptive way.

Manhole-to-manhole lining is the fastest, most cost-effective way for municipal planners to handle significant sewer damage. As lining can be applied using existing manhole entry points, there’s zero need to reroute traffic or disrupt everyday commuting. Manhole-to-manhole lining even preserves water flow, by rerouting flow seamlessly during repair.

4.) Sealant for Damaged Pipe Joints and Connections

Interfit USA’s liquid-based, PVC-coated lining materials are perfect for repairing weak pipe joints or fracturing at lateral connections (repair needs that, otherwise, it could cost you thousands in digging and labor hours). Trenchless pros use these resin liners to effectively form a seal over damaged joints and critical structures.

As liners cure in place within these joints and can be applied through existing entryways or non-invasive boring holes, manual digging can be entirely avoided. In some cases, these repairs can be completed in as little as one hour.

Whatever your underground pipe repair needs are, Interfit USA provides the ample solutions that trenchless experts use every day to restore pipes thoroughly, while saving you money and time.

5.) Effective Lining for Any Pipe, of Any Size

What makes trenchless, epoxy-resin liners so valuable for pipe repairs are the many ways trenchless technicians can use them, and their high versatility with various pipe configurations, materials, and sizes.

Trenchless liners can restore pipe damage to any kind of pipe, no matter the size or structural point. Trenchless liners, like those made by Interfit USA, can restore pipes built with any of the following:

  • Clay
  • Iron
  • Steel
  • Orangeburg pipe material
  • Cement
  • PVC or other plastics
  • Varying diameters (6-12” for mainline, 4-6” for lateral)
  • Varying angles, anywhere from 0° to 180°

Contact Express Sewer if You Need Help With Interfit Lining

If you think Interfit lining solutions or other trenchless repair technologies can help you restore your pipes affordably, and with minimal intrusion, don’t hesitate to contact trenchless pros right away.

Pipe Bursting Special Sacramento         

This post first appeared on https://www.expresssewer.com

Common Trenchless Technology Equipment For Sacramento Municipal Projects

trenchless_equipment

Here at Express, we tout the many benefits of trenchless plumbing all the time, and with good reason: it saves both time and money. No matter how clichéd that may seem, no matter how meaningless it may sound, when it comes to trenchless technology, it’s true. We’re committed to bringing our valued customers to the forefront of plumbing technology. That means trenchless technology for Sacramento.

Read More

Choosing a Water Heater and Water Softener: Pros and Cons

Choosing the right water heater and water softener for your home is important for your comfort and overall water quality. A water heater ensures you have hot water for showers, washing dishes, and doing laundry, while a water softener helps reduce the hardness of your water. Hard water can cause scale build-up in pipes and appliances, impact the effectiveness of soap, and leave your skin and hair feeling dry.

With many options available on the market, picking the best water heater and water softener can seem overwhelming. Each brand and model offers different features, efficiencies, and price points. Understanding the benefits and drawbacks of each option can help you make an informed choice that fits your needs and budget.

This article will guide you through the essential functions of water heaters and water softeners. We’ll compare notable brands for each, highlighting their pros and cons, so you can decide which ones are right for your home. By the end, you’ll be better equipped to choose the best solutions for your water heating and softening needs.

Understanding Water Heaters: What Do They Do?

Water heaters are essential for providing hot water in your home. They heat cold water and store it until it’s needed for tasks like showering, washing dishes, or doing laundry. There are different types of water heaters, including tankless, storage tank, and heat pump models.

Storage tank water heaters are the most common. They store a large amount of hot water in a tank, so hot water is ready whenever you need it. Tankless water heaters, on the other hand, heat water directly as it flows through the unit. This means they don’t store hot water but provide it on demand, making them more energy-efficient. Heat pump water heaters use electricity to move heat from the air or ground to heat the water, which can be more energy-efficient than traditional electric water heaters.

Water Heater Comparison: Brand A vs Brand B vs Brand C

When choosing a water heater, it’s helpful to compare popular brands:

1. Brand A: Rheem

– Pros:

– Energy-efficient models

– Wide range of sizes and types

– Great warranties and customer service

– Cons:

– Some models can be expensive

– Professional installation might be needed

2. Brand B: Bradford White

– Pros:

– Reliable and durable products

– Good customer support

– Variety of models to fit different needs

– Cons:

– Higher initial cost

– Limited availability in some areas

3. Brand C: A. O. Smith

– Pros:

– High energy efficiency

– Available in many models and sizes

– Strong warranty options

– Cons:

– Higher price point for some models

– May require professional installation

Comparing these brands can help you decide which water heater best fits your needs and budget. Each brand offers a range of models, from energy-efficient options to units with various storage capacities. Knowing the pros and cons of each brand allows you to make an informed choice for your home.

Understanding Water Softeners: What Do They Do?

Water softeners are devices that help remove minerals like calcium and magnesium from your water supply. These minerals cause hard water, which can create scale build-up in your pipes and appliances. Hard water can also make it harder to clean your dishes, laundry, and even yourself, leaving soap scum and making your skin and hair feel dry.

Water softeners work by using a process called ion exchange. The system typically has a tank filled with resin beads covered in sodium ions. When hard water passes through the tank, the mineral ions swap places with the sodium ions, effectively “softening” the water. The softened water then flows out into your home, providing a more effective and gentle water supply.

Water Softener Comparison: Brand X vs Brand Y vs Brand Z

When choosing a water softener, comparing popular brands can help:

1. Brand X: Culligan

– Pros:

– Customizable options to fit specific needs

– Reliable performance and durability

– Good customer service and maintenance plans

– Cons:

– Higher price range

– Requires professional installation

2. Brand Y: Kinetico

– Pros:

– Non-electric operation for energy efficiency

– Highly efficient in reducing hardness

– Durable and long-lasting

– Cons:

– Can be more expensive upfront

– Limited DIY maintenance options

3. Brand Z: WaterBoss

– Pros:

– Compact and space-saving design

– Affordable price point

– Efficient at softening water and easy to install

– Cons:

– Limited features compared to higher-end models

– May require frequent maintenance

Comparing these brands helps you understand the different features, efficiency levels, and maintenance needs. Each brand offers unique benefits, so knowing their strengths and weaknesses can guide you in selecting the best water softener for your home.

Conclusion

Choosing the right water heater and water softener is vital for ensuring your home’s comfort and efficiency. Understanding how these systems work and comparing the pros and cons of top brands give you the knowledge you need to make an informed decision. Whether you need a reliable water heater or a water softener to improve your water quality, carefully considering the options will help you find the perfect fit for your needs.

If you’re unsure about which water heater or water softener is right for you, or if you need professional installation, don’t hesitate to contact our plumbing contractors in Ottawa. At The Irish Plumber, we are here to help you with all your plumbing needs. Call The Irish Plumber today to get expert advice and quality service. Let us ensure your home has the best water solutions available.

Clean Up Your Act! Keep Your AC Outdoor Unit Happy

AC-outdoor-unit

Whether you have a central AC unit, a heat pump, or a ductless mini split, it has an outdoor unit. This is the compressor, where the condenser lives, pressurizing the refrigerant so it will flow through the whole system of coils. And the condenser is more than just the most essential component of the system. It’s also the most expensive.

If your compressor fails, it can’t be repaired. It may be possible to replace the compressor, but chances are, it wouldn’t be a good investment. It’s so costly that putting a new compressor into an aging air conditioner, which would soon need replacing anyway, would be a waste of money. You need to keep your AC outdoor unit happy, so it can live a long, hard-working life. We’ll tell you how. If you need to schedule maintenance or repair, or if you have any questions about your AC outdoor unit in Livingston, NJ, don’t hesitate to reach out.

Promote Good Air Circulation

The most important thing for your compressor is that it must be able to dissipate heat. If the condenser coils in the outdoor unit can’t get rid of enough heat, the air conditioner will have to run more and more of the time. This puts a great deal of unnecessary strain on the compressor. This means plenty of air must circulate through and around the outdoor unit.

  • Clear the Area: Trim back any plants, trees, or shrubs that grow close to the outdoor unit. Rake up lawn clippings or autumn leaves so they won’t pile up around the outdoor unit. This will give space for air to move freely.
  • Clean the Unit: Another thing that can prevent heat from dissipating is a layer of dust or dirt forming on the coils. It will act like insulation, trapping the heat inside the coils. To keep the coils clean, you need to give them an occasional hose-down. Just make sure you don’t use a high-pressure nozzle. Gentle water will clean the unit without causing any damage.

Reduce Your Use

The more the compressor has to run, the more wear and tear it will accumulate. Cut down on this by cutting down on the amount of time you need to use your air conditioner. Several small things can work together to make a big impact here.

Use ceiling fans, turning counter-clockwise, to keep air moving. You’ll feel just as cool with the thermostat set a few degrees higher. Block sunlight from directly hitting windows. Seal up drafts around doors and windows to keep the cool air in. And control your humidity: again, you’ll feel just as cool with the thermostat set higher if the air is dry instead of humid.

Prioritize Maintenance

By cleaning all the inner workings of the air conditioner and lubricating all the moving components to reduce friction, maintenance reduces the strain the compressor experiences. Your air conditioner needs maintenance every single year to stay in tip-top shape. This can drastically increase the lifespan of the air conditioner.

Get Repairs Promptly

If you do think that something is wrong with your air conditioner—if you notice a funny noise, strange smell, poor performance, uneven cooling, or a spike in your electric bill—have a technician check it out right away. An AC unit that’s struggling with a problem will often have to run more of the time, which means more strain on the compressor.

Contact MarGo Plumbing Heating Cooling Inc. today with AC concerns or any questions about your HVAC system!

The post Clean Up Your Act! Keep Your AC Outdoor Unit Happy first appeared on MarGo Plumbing Heating Cooling Inc..

This post first appeared on https://margoplumbing.com

+1-877-959-3534