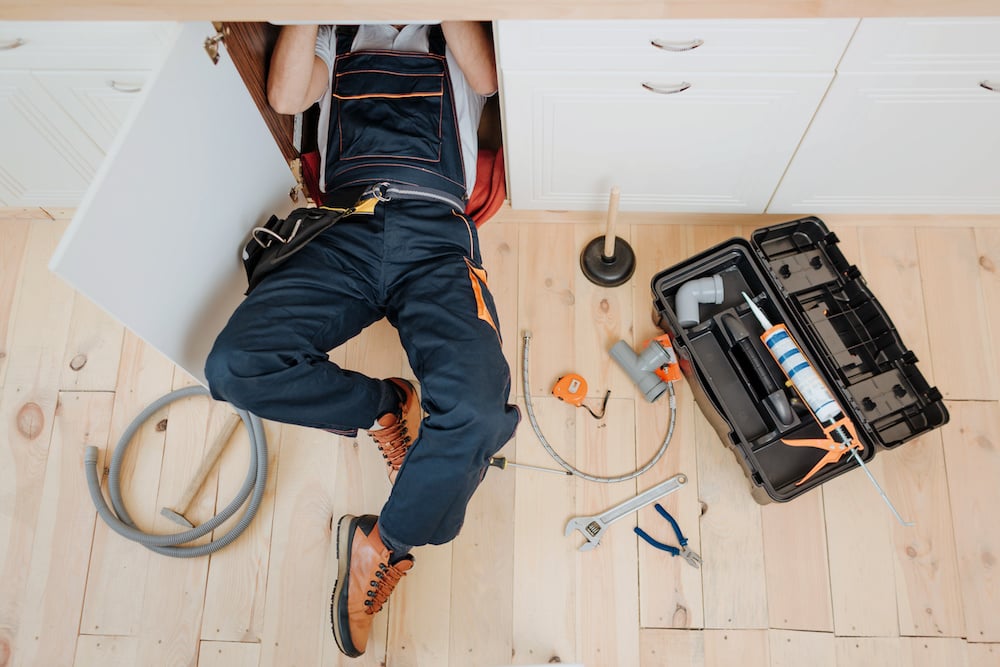
Do-it-yourself projects continue to grow in popularity as people tackle home projects on their own to save money, beat stress, and gain a sense of self-accomplishment. In fact, DIY trend statistics show that nearly 50% of U.S. homeowners took on DIY home improvement projects in 2019, and a 4.2% rise in DIY home projects is expected in 2022. One problem area some homeowners try to solve on their own is plumbing.
All of the plumbing fixtures, drains, and pipes in your home are connected to the biggest (and most important) piece of plumbing in your entire home is the main sewer line.
Between improper use of these fixtures, drains, and pipes and many other outside factors, the main sewer line can take a beating over time. Eventually, the main sewer line can become clogged (or even collapse) to the point of needing serious repair or even replacement. This wear-and-tear can turn into a headache that you don’t need!
Knowing what causes sewer lines to clog and the warning signs to look out for can help prevent you from ever having to deal with a major repair or replacement.
What Are the Common Causes of a Clogged Sewer Line?
Almost every homeowner has run into the unfortunate situation of having a clogged drain or a slow-running sink or bathtub. While a single clog can be a pain, it’s typically easy to fix.
However, what happens if all the drains in your home begin backing up at once?
It could be a sewer drain clog. The repair or replacement of an entire sewer line (or even just a section) is sometimes required when drain clearing efforts don’t work. Here are the primary indicators that a repair or replacement procedure is required:
1. Severe Pipe Damage
When sewer pipes are broken or ruptured, the sewage won’t be able to properly drain through the system—leading to immediate and frequent backups. Common causes of sewer pipe damage include:
Sewer pipe rupture due to shifting soil, settling, increased traffic on the ground above, or use of heavy construction equipment above ground.
Corrosion of an older pipe, causing the pipe to break or collapse.
Leaking joints where the seals between sections of pipe have broken, allowing water and sewage to escape.
2. A Sagging Sewer Line
While this is out of a homeowner’s control, sagging sewer lines happen over time. This “bellied” pipe occurs when a section of the pipe has sunk due to ground or soil conditions.
The low spot in the line will begin to collect paper and waste—resulting in repeat blockages.
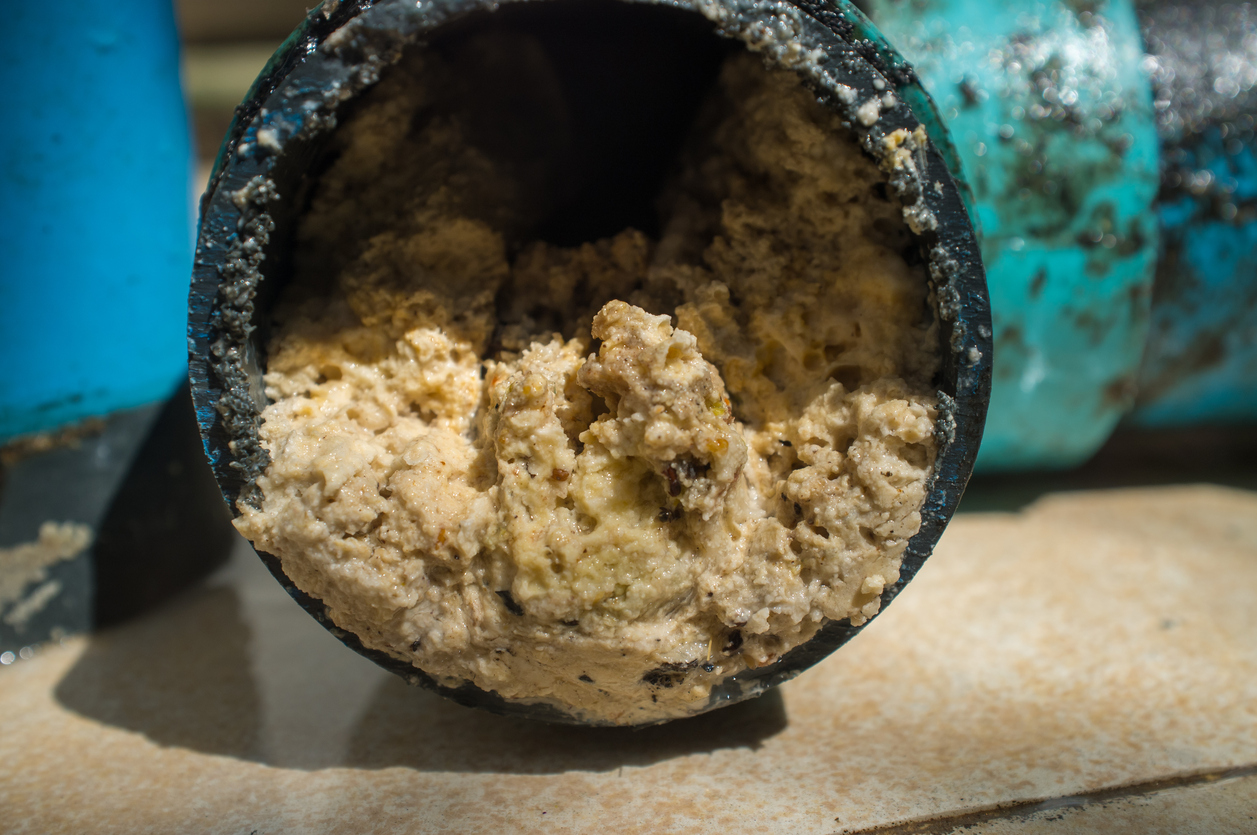
3. Tree Root Infiltration
Older sewer lines were sometimes constructed out of clay or other porous materials. In addition, the connections between the pipe sections weren’t as tight as today’s PVC pipes.
As tree and shrub roots grow, they search for sources of water. If they latch onto a sewer pipe, they will grow into the pipe in order to reach the water inside. As the roots expand over time, it can cause the line to break.
Treating your toilet as a trashcan will cause sewer drain issues. The number one rule to remember when flushing the toilet—make sure only human waste and toilet paper goes down.
5. Pouring Grease Down the Drain
Grease, fats, and oil are all some of the biggest culprits when it comes to clogging lines. It’s NEVER a good idea to pour grease, oil, or other fats down a drain.
Always pour hot grease into a coffee can or jar. Once it solidifies, you can throw it away. People mistakenly think that running hot water when pouring grease down a drain helps wash it away. This is not the case.
If you’re concerned about catching your sewer line issue before it’s too late, we’ve gathered four warning signs you should look out for:
Drains or Sewer Line Keeps Clogging
Our advice to you is to steer clear of liquid “drain cleaner” and call a professional to check out that backed-up drain! If you have a drain that continuously clogs, especially in the lowest level of your home, it could come from a break or blockage in your sewer pipe.
Multiple Fixtures Are Clogged
You aren’t sure if the toilet or shower drain keeps clogging because of an individual pipe blockage or because of a sewer line issue. However, a very obvious sign of a sewer line issue is when more than one plumbing fixture backs up at the same time.
Strange Reactions When Using Plumbing Fixtures
The next thing to look for when you suspect a sewer drain clog is any unexpected or unusual reactions when using plumbing fixtures. You may have a problem if:
Flushing the toilet causes water to back up from your tub or shower.
Toilet water starts to bubble. Should this happen, run water in the sink closest to the toilet for a minute or so. If the water continues to bubble (or rises), then it’s not a fluke.
Hearing a gurgling noise as the toilet flushes or the water in your bathtub or shower is draining. If you hear this, contact your local plumber.
Your Lawn Starts to Change
A sewer line typically extends from your home, through your front lawn, and into the city’s sewage system. Head outside and see if you can notice any of these changes to your lawn:
If you have a break in your sewer line, you’ll see an indentation on your lawn.
If you find a soggy patch of grass when it hasn’t rained or snowed recently, it may be sewage from a broken sewer pipe.
Sewer Line Repair & Replacement Options
While some drain cleaning and maintenance tasks can be safely performed by a homeowner, sewer line repair and replacement tasks should always be performed by a certified, professional plumber.
Video Inspection
By employing an in-line video inspection camera, you will be able to see where the problem lies and experience faster and less costly repairs. Here’s how it works:
Images captured by the camera are transmitted to a device operated by the camera technician. These images are recorded for further review.
At the same time, a radio transmitter on the camera records the physical location of the line and its depth from the surface, so the appropriate repairs can be properly planned and implemented.
Once it’s determined—and you agree—that a sewer line must be repaired or replaced, there are a few options to choose from.
Traditional Sewer Line Repair or Replacement
The traditional sewer line repair or replacement is typically performed using a backhoe to dig up the area surrounding the line, allowing easy access to the problem area. Once the repair is made, the backhoe is used to refill the area.
This option may be the only option at times, depending on the condition of your pipes, their configuration, or where you live.
Trenchless Sewer Line Repair Methods
Trenchless repairs involve making small access holes where the damaged pipe starts and ends. A new pipe is then pulled through the existing pipe, which bursts the old pipe into pieces while simultaneously laying new pipe.
Trenchless repairs cause less damage to yards and driveways than traditional repair methods because only the dirt at the beginning and end of the line is disturbed.
Contact a Professional Plumber for Your Sewer Line Repair Needs
No matter what option you eventually choose, the work needs to be completed by an experienced and licensed professional plumber. At Len The Plumber, we’ve been serving the Mid-Atlantic region with unrivaled plumbing services for more than 20 years, and we consider our plumbers the best in the business. If you’re having a sewer or drain issue, we guarantee we can diagnose and fix it—often the same day!
For sewer line repair and replacement in MD, DC, VA, DE, or PA, trust the experts at Len The Plumber. Contact us online or call (800) 950-4619(800) 950-4619 today!
A leaky faucet often indicates a problem with one of the parts being worn out. How you go about repairing the faucet depends on where it drips and the mechanical makeup of your faucet. You have four main types of faucets that will depend on compression, disc, cartridge, and mechanism.
Before you attempt to fix a leaky faucet, you should first determine the type of faucet to understand how you go about fixing it. Here are some of the tools you will need before starting:
If you have a widespread faucet there are usually decorative covers over the valves. Most times there is a fine thread on the valve assembly so attempt to unscrew the trim piece. ÿBeneath each knob, you will find a screw that mounts the handle to the stem. You will unscrew the handle and gently remove the handle. Sometimes the faucet handle will not come off the stem easily. Spray the WD-40 on this part to loosen it.
After you have loosened the packing nut, you should see the stem. You want to take this part off all. At this point, different faucets will diverge in how you deal with them. For example, you have some stems that pop off while others will twist from the valve. Remove everything gently. You want to skip over the possibility of damaging the parts because this could exasperate a leaky faucet problem.
If your faucet is under 25 years old it has a cartridge. After turning it on and off for 25 years the seats are probably worn out. Attempt to pull the cartridge straight out using a set of channel locks pliers. Sometimes these cartridges are tough to remove because scale has built up and locked them in place. Give the cartridge a slight wiggle while pulling and it should eventually work itself out. If you can?t remove call a plumbing professional. There are cartridge removal tools available.
Replacement washers and O-rings.
Replacement washers and O-rings. Adjustable wrench. Philips screwdriver. WD-40.
O-ring.
Stem.
O-ring. Stem. Packing nut. Screw. Handle.
At this point, everything should remain together. Look at the washer and the O-ring inside of the valve seat. Many times, this part causes leaks when damaged, or the seal starts to wear off. You will remove the washer and replace it with the new washer.
You will also want to replace the O-ring because many times this component experiences damage. Before replacing your O-rings and washers, first, check to see if it fits right. When unsure of either, look at the seat to check if the sides will fit with the flat washer. You may have to buy a more appropriate size.
For those with problems finding the right sized O-ring, instead, take it to the hardware store to get an exact fit. For those unsure about this, check the seat and see if the sides will fit the cone shape. Then you can buy the appropriate O-ring. Instead of taking an old O-ring to the hardware store, you can also opt out of that to buy a variety of different sized O-rings in a package. It does cost a couple of extra bucks, but it will be worth every penny to get the size needed.
Once you have the parts, you will need to reassemble them. It will be done in this order when putting it back together:
Tips and Troubleshooting
After you have taken apart and reassembled your faucet, you will want to check to see the faucet no longer drips. If it does, the cause could be deeper than a busted O-ring. In many cases, the next possibility lies in corrosion with the valve seat.
This happens when it remains dirty over time and eventually produces a leak closer to the spout of the faucet. If that fails to fix your leaky faucet, other potential problems include loose parts, worn-out seals or broken plumbing. If you have tried these things without success, it might be time to hire the big guns and call a plumber.
Putting It All Together
When this happens, you will have to identify where the water enters the home to shut it off. Keep in mind, when you shut off the water valve, an entire residence will cry out for the lack of water. Nevertheless, it sometimes becomes necessary during a repair.
We’re reaching the final days of January, but this doesn’t mean that it’s too late to get the ball rolling on some of your New Year’s resolutions. It’s not always about how you start. How you finish is just as important. If one of your goals is to keep your home clean and functioning, then make sure that you’re taking care of plumbing in Orlando, FL.
One of the best ways to do this is with drain cleaning. Today, we want to take the time to answer common questions and give you the best advice surrounding this service. We’re professionals you can trust because of our reputation. We’re known for our exemplary service.
What You Need to Know About Drain Cleaning
So let’s start from the beginning–what exactly is drain cleaning?
Professional drain cleaning is when plumbing technicians use specialized tools to remove buildup from your drains. Here on our team, we like to hydro jet. Hydro jetting uses a high-powered stream of water into your drain to get the buildup off of the sidewalls. This is going to get rid of things that cause build-up like coffee grounds, fat, oils, and grease. It’s going to get rid of current clogs, help prevent future ones, and keep your pipes in great shape throughout the entire process.
Why Drain Cleaning Helps Long-Term
Now you may wonder how drain cleaning helps long-term. We mentioned it above, but we’ll get into the details here.
Of course, drain cleanings are something you should call for if you’re experiencing a clog. Drain cleanings are also something you should invest in on a routine basis even when there isn’t a glaring issue with your plumbing.
Routine cleanings are great because they get rid of all the little things that add up to poor plumbing. Mild things like soap scum buildup or hair in your shower drain can cause poor drainage that many people just deal with. Routine cleanings ensure that you’re never “dealing with” anything.
Routine cleanings help prevent future clogs and extend the lifespan of your plumbing system as well. It does this by clearing away the subtle problems we mentioned above. This clears build-up and gives you a better chance to avoid preventable clogs in the future. Our pros will make this easy for you with their high-quality service.
Why Drain Cleaning Is Always Better Than Chemical Drain Cleaners
One thing we want to leave you with is the importance of avoiding chemical drain cleaners. Chemical drain cleaners are no good. We understand how it might seem like a good idea to go to your local store, grab a chemical drain cleaner off the shelf, and then pour it down the drain. The problem with chemical drain cleaners is that they really don’t clean well. Chemical drain cleaners are actually caustic. They’ll eat away at your clog but these also corrode your pipe itself. This is why you should invest in professional service.
Professional service is sure to get rid of your clog and leave your pipe in perfect condition.
Sure, we know that in the immediate aftermath, having a family friend check on your furnace system when something is wrong could seem like the cheapest solution. While we’d beg to differ when you look at the long term, we understand that in the short-term those kinds of repairs will always be cheaper. However, they will never be safer.
We understand that you might have a buddy who is a volunteer firefighter, or even a scientist at the nearby University, but that doesn’t mean they’re especially well-equipped to provide a furnace safety inspection the right way. These are complex systems, and when something is going wrong you need professional furnace repair in Caldwell, NJ to ensure that there are no safety issues cropping up.
Let’s focus on three reasons why professional furnace repairs will always be the safer option when compared to DIY or amateur fixes.
Burners Need to Be Treated With Care
Firstly, in order for a furnace repair to go smoothly, the burners need to be treated with care. This is not something that everyone who knows a thing or two about furnaces will inherently identify. Burners are responsible for actually burning the fuel that comes into the combustion chamber and turning it into heat. With improperly handled burners, they could get dirty or broken, and you could start seeing a build-up of gas inside the system.
When a professional handles your furnace repair, you can rest assured that they’ll keep the burners in good shape and might actually clean them to ensure they work safely and properly. These are some of the most sensitive components of a furnace and they should never be handled by amateurs.
The Heat Exchanger Must Be Kept Safe
The heat exchanger is a delicate component. It’s responsible for separating the combustion gases that come from burning fuel, from the clean air of your home that needs to be kept safe. When a crack develops in the heat exchanger, you could see an influx of natural gas, smoke, or carbon monoxide entering your home’s breathable air which is absolutely a safety concern.
Professionals are trained to spot issues with heat exchangers. Not only that, professionals will never accidentally bump or break the heat exchanger for whatever reason, which is something that an amateur could do.
Vents and Exhaust Must Be Kept Clear
Where do those exhaust fumes go after they’re created through the burning process? They need to be vented out of your home of course! Sometimes your ventilation and exhaust systems could have problems, and an amateur might not have the tools to address them correctly. This could mean that they end up accidentally breaking or clogging up your exhaust vent which is a huge safety problem, as the exhaust will have nowhere to go but back into your home.
Professionals know these systems to the point where they will never jeopardize your home’s health and safety with unreliable service. Pros from our team treat vents and exhaust ports with complete care.
Incorporating Universal Design Into the the Bathroom Shower
ÿ
Universal design addresses the need to create living spaces, including the bathroom shower that are accessible to anyone, regardless of their age or physical ability.ÿAccording to the AARP, one in four Americans will be 65 or older by the year 2020. Additionally, 56 million Americans, or approximately 19 percent of the US population, reported having some sort of disability on the 2010 census. These statistics demonstrate the growing need for spaces that comply with universal design standards, and with an increasingly aging and disabled population, it is imperative that designers, architects and plumbers adhere to universal design guidelines in order to accommodate everyone?s needs.
Hansgrohe makes a product called a ?FixFit? wall outlet. When strategically placed and installed with a handshower, it puts the control of the water closer to the bather, something that is vital for individuals who are unable to stand up in the shower. Mounting the FixFit wall outlet closer to the seating area puts the handshower at a height that can be comfortably reached. For care-givers who need to multi-task when caring for individuals in the shower, the handshower can be turned on and off in a pinch, further streamlining the bathing process for both parties.
Hansgrohe?s Raindance Select E 120 AIR Green 3-Jet Handshower is an excellent option for those looking to incorporate universal design in their homes. The handshower is easily removed from its stationary wall mount and can be paired with an accessible wall outlet, letting individuals with limited mobility easily and independently bathe themselves.ÿIn addition, the Raindance Select offers its users the opportunity to choose between three different spray settings (RainAir, Rain and WhirlAir) by clicking theÿergonomicallyÿplaced ?Select? button. Conventional hand showers require the user to grasp and rotate the spray face when changing settings. Those with limited range of motion in their hands and fingers will find that changing the spray settings by pushing a button is easier and more comfortable to use.
For more information, please visitÿhttp://www.universaldesign.com, a website that is dedicated to providing free access to universal design information.
The bidet has been around for centuries, but it’s never quite taken off in American households. However, that may be changing (even though it took a pandemic to do it). So, let’s take a look at bidet history, why it’s growing in popularity across the United States, and how it stacks up against good ol’ TP.
We are now well and truly into the winter months. While Phoenix, AZ doesn’t typically get too freezing temperatures, there are nights when we are truly thankful we have a furnace to keep us warm and comfortable. Imagine, in the middle of a cold night, your HVAC system decides that enough is enough.
Your heating system works harder in the cold months. It’s running nonstop to keep you warm and comfortable, so it’s understandable that this can take a toll on your system.
When things do go bump in the night, it’s often just a minor issue that a little TLC can fix. Many homeowners tend to then ignore the issue until it comes around again, or causes an even bigger problem.
Here are five reasons why you should never delay a heating repair.
1. Extends the heater’s life-span
In the winter months, your system works much harder. If you neglect to give your system regular maintenance and have any minor issues fixed, it may only last five years instead of fifteen. If you suspect that something is up, give the professionals a call and have it looked at. You’ll be thankful in the long run.
2. Ensures the heater will be ready to warm up your home
Having a system in top condition means that when it’s needed, it’ll do the job well. If something breaks in your heater, it may not stop working immediately. Often when the system has been off for a while and needs to kick into action, the issue becomes far more prominent. This is where you risk doing greater damage. Call the professionals. That way, you’ll never have to stress about whether or not your heater will function as it should.
3. Prevents even bigger repairs
We’ve spoken about this one above, but it’s important that we really shine the light on this. It might seem safe enough, but delaying repairs could cause even bigger issues soon. What may be a simple fix can turn into an expensive repair.
4. Ensures that you don’t have rising heat costs
The best and most ideal way to keep your home warm is with a fully functioning heating system. If you’ve been holding out on those repairs, then it’s likely that you’re looking at rising heat costs as well due to an inefficient system. A system that is poorly maintained will have to work much harder to warm your home, which will not only increase your electricity bills but may cause components in the heater to fail. It’s really not worth the risk.
5. Keeps your family safe
A damaged heater can be dangerous for you and your family. A cracked component can cause toxic fumes to enter your home, which is quite dangerous when you consider how much time you spend in your house. Carbon monoxide poisoning has claimed many lives in homes across America, which is often a result of people failing to get their heaters repaired in a timely fashion.
No item in the American household is more ubiquitous than the modern commode or toilet. Perhaps no one item must be more immediately repaired if made non-functional to keep the home habitable. We will be identifying the 11 most common toilet tank parts. Should the need ever arise, you will be able to diagnose the problem with your toilet, identify the part requiring placement, and proceed with the required repairs ? thus saving time, money and aggravation.A plumber showing up to replace just one or two toilet tank parts will cost you at least $$. The price of those toilet tank parts could be as little as a few dollars. Having a plumber show up to replace those same parts at night, on weekends, or holidays, you can expect that price to double.
The operation of a toilet is somehow simple, yet complex. The function of the bowl, tank, flanges, fillers, rings, nuts, and levers work in unison to create the swirl and the flush to sweep waste from your house. The typical flush cycle actually works something like this:
One thing to keep in mind is that the actual toilet tank parts will vary in different commodes and new parts may have different designs incorporated into them. Regardless, there is enough commonality and interchangeability that repairs with different parts than original are possible and even commonplace.
The flush cycle starts with pushing the flush lever which is mounted on the reservoir. This pulls the chain attached to the flapper valve and gravity causes the water in the tank to flow through the siphon and through the rim holes and into the bowl flushing away the waste. The mass of the water leaving the tank is sufficient, that as it travels the S-bend, it creates a siphon which evacuates the contents of the bowl into the main drain.As the water in the tank leaves, the float valve inside falls, activating the fill valve which opens to let pressurized water back into the reservoir tank. The flapper valve then falls back to the bottom closing the valve. As the water level moves back, the fill valve switches off and the cycle is complete and ready to repeat as necessary.ÿ
water level moves back, the fill valve switches off and the cycle is complete and ready to repeat as necessary.
image by pixabay
The flapper is the barrier between the siphon and bowl and the reservoir tank. It is activated by the flush lever pulling the metal chain attached to it.
The flapper valve sits in this seat which provides a seal so that water does not leak from the tank past the flapper valve.
The flush lever is what activates the flush cycle by being depressed and pulling the metal chain which pulls the flapper valve away from the flush valve seat, allowing water to rush by.
1. Flapper valve
The fill valve has a plastic float surrounding it filled with air and as the water leaves the reservoir, the buoyant float drops down the body of the fill valve activating the valve which is under pressure. As the reservoir tank fills, the plastic float returns toward the top and then disengages the fill valve cutting off the flow when the proper water level is reached.
11 Toilet Tank Parts You Should Know About
This tube travels from the fill valve to the overflow tube.
The refill tube clip is attached to the refill tube and clips it in place on the overflow tube.
Common Problems and Repairs
The overflow tube serves as an open drain pipe should anything go wrong in the tank which would lead to an overfill situation and drains any water above the overflow tube directly away.
You head into your shower on a chilly winter morning, turn the handle over to the right, and hop under the stream of water expecting warmth. The unpleasant surprise is that you’re met with cold, chilly water raining down on you. This doesn’t make for a pleasant morning. Now you know that you have a plumbing problem that you need to handle as soon as possible.
When you need plumbing service, we’re the team who can help you with your water heater in Paradise Valley, AZ. If you’re struggling with cold water, we’re here to help you figure out exactly what’s going on today.
The Cause of Your Water Heater’s Cold Water
There are quite a few reasons why your water heater might start producing cold water. Here are a few of the most relevant reasons.
Mineral Build-Up
If you’ve talked to a professional about water heater troubles in the past, then you’ve probably heard about mineral build-up. It’s something that plagues water heaters that aren’t routinely serviced. Mineral build-up occurs because of the natural mineral level that exists in the municipal water supply. These minerals naturally deposit over time and calcify as the water heats and cools. This is what creates mineral build-up. If there’s enough of it in your hot water tank, it can actually prevent hot water from getting to you easily. This results in you feeling cool water from your faucets.
A Bad Heating Element
Electric water heaters have a heating element that kicks off the entire process. If your heating element begins to degrade, it will have trouble actually performing its job. You might notice the temperature of your water cool down and dip over time. Put the replacement of this part into the hands of professionals: we’re the only ones who can guarantee satisfactory results.
A Broken Thermostat
One reason that you might run into cold water is a broken thermostat. Most water heater thermostats keep the water between 120 to 140 degrees Fahrenheit. The setting within this range typically depends on the needs of your home. Although this is where the setting should lie, it is possible for things to go wrong and get off track.
If you notice that your thermostat setting has dipped below the 120 mark, then you can turn it back up. If you keep running into the problem of it dipping below this mark, then it’s time to contact a professional. There’s something wrong with your thermostat and we can help you fix it.
The Importance of Professional Service
We know just like you know that plumbing problems are no quick fix. When your water heater can’t deliver, our team members will be there to fix it. We’re able to do this because we understand the ins and outs of water heater service. You can rely on us to fix anything that’s gone wrong.
We’ll also be by your side for maintenance and replacement services. Water heater maintenance is vital whether you have a tank or tankless model. We can also help you choose a new unit when you’re ready to upgrade.


 We’re reaching the final days of January, but this doesn’t mean that it’s too late to get the ball rolling on some of your New Year’s resolutions. It’s not always about how you start. How you finish is just as important. If one of your goals is to keep your home clean and functioning, then make sure that you’re taking care of

 You head into your shower on a chilly winter morning, turn the handle over to the right, and hop under the stream of water expecting warmth. The unpleasant surprise is that you’re met with cold, chilly water raining down on you. This doesn’t make for a pleasant morning. Now you know that you have a plumbing problem that you need to handle as soon as possible.