Shower Leaks Behind Wall: How to Fix Them in 7 Steps
We are a participant in the Amazon Services LLC Associates Program, an affiliate advertising program designed to provide a means for us to earn fees by linking to Amazon.com and affiliated sites.
Part of owning a home is maintaining it. These responsibilities are amplified if you have an older home. In fact, you may not have even realized just how much work it actually needed when you bought it. If the problems you encounter include shower leaks behind the wall, you could end up with lasting damage to your walls and a sky-high water bill.
Ironically, the shower leaks you see are the ones that are relatively easy to fix. It’s the leaks you can’t see that are the real hazard. Often, you don’t even know there is a problem until you notice the damage. If you are facing these issues, we have a few quick tips on how to fix the problem yourself and prevent more damage from occurring.
A word to the wise: If shower leaks behind walls are a bigger project than you feel comfortable handling, there is no shame in contacting a reliable plumbing service. There are times when you need to call in a professional, and this may very well be one of them.
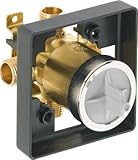
- Complete flexibility: Delta’s MultiChoice universal valve gives you flexibility to upgrade your shower trim without…
- Recommended use: Compatible to meet the needs for the most commonly used plumbing methods and is ideal for shower units…
- Universal connection options: 1/2-inch universal inlets accept 1/2-inch copper, 1/2-inch iron pipe, PEX or CPVC adapters
1. Signs of a Shower Leak Behind Wall
Shower leaks behind walls are not always easy to notice. In these cases, your detective skills will be as important as your handyman skills. While you may not “see” an internal leak, you will find its evidence.
If your shower is on the first floor and you have a basement you may find water dripping from the ceiling onto the basement floor. Water leaks can be tricky to track. How water moves is interesting. It can wick up a wall, it can run along a stud or a beam and end up in a completely different spot. So you have to be diligent in your detective duties.
One of the tell-tale signs of a water leak coming from a shower valve behind the wall is water stains. If you have an upstairs bathroom, you may notice dried water stains on the ceiling below the shower. When someone is showering, you might see water dripping from the ceiling. Most times shower valve leaks behind the wall are very slow. Usually, they are pinhole leaks from a faulty valve or sloppy soldering from the water connection points to the valve.
Over the years the joint wears out or the flaw in the casting process of the valve rears its ugly head. One other sign of a shower leak behind the wall is the drywall/tile in front of the valve becomes spongy. This is usually caused by water spraying from the leak in the back of the wall.
2. Determine Where Your Shower Is Leaking
If your shower leaks behind the wall, most times you can’t tell from the front side of the shower. So you have to do one of the two things.
- Remove the shower plate to see if you have enough room around the valve to inspect the valve connections.
- If you can, remove a portion of the wall behind the valve so you can inspect the valve and all associated piping.
Sometimes builders or homeowners (Especially someone that has had problems in the past) install an access panel in the wall behind the shower so you can easily inspect or repair water pipes that go to the tub and shower. If this is the case for you, just take the panel off for inspection. For most houses, it is necessary to cut a little window out of the drywall to see the water pipes. It is an easy fix, considering the water damage that could occur if you do not seal the leak.

3. Cut an Inspection Window
A stud finder would be an excellent help for this project. To decide where to cut the window in your drywall, you must locate the studs in the wall. If you do not have a stud finder, then you have to go old school. Most homes have studs on 16″ centers. Meaning they have a stud every 16″ center to center. You can measure 16″ from the inside wall and knock on the wall. You can hear the difference in the way a dry wall sounds when a stud is behind it.
Please note, most showers aren’t big enough at least along the side with the showerhead and valve to have two studs in the right spot, The carpenter may only use two in the middle of the wall with the valve so they can brace the and secure the valve.

Use a reciprocating saw to cut a small window into the drywall. A 10X8 inch square should be enough for you to inspect the shower pipes. You will need a flashlight and a small mirror to get the best view of your shower leaks behind a wall.
4. Look for Signs of Leaking
If your shower leaks behind the wall, you will see water stains on the drywall ceiling below the tub drain. To be sure these stains were not from the bathtub drain, run a little water in the tub and see if the drain is leaking. Feel around the copper pipes for any wetness from recent use. You will probably observe greenish-white discoloration on the copper pipes due to oxidation from the water leaking on the outside of the copper piping. If you have a home using PEX it’s tough to tell.
- Complete flexibility: Delta’s MultiChoice universal valve gives you flexibility to upgrade your shower trim without…
- Recommended use: Compatible to meet the needs for the most commonly used plumbing methods and is ideal for shower units…
- Universal connection options: 1/2-inch universal inlets accept 1/2-inch copper, 1/2-inch iron pipe, PEX or CPVC adapters
5. Turn on the Shower
The reality is many homes don’t have access to the shower valve from the backside of the valve. So for many front side access is a must. Be that as it may, being able to watch the valve and surrounding piping while the water is on is the true test to see if your shower leaks behind the wall.
While it is running look for signs of water leaking. If you feel water trickling down the sides of the pipes, you have found your source. Sometimes, the leaks are faint, so you may need your flashlight and mirror to look for minute drops of water forming around the joints of the water pipes.
Inspect above in the access window with your flashlight. The water may be leaking from the pipe that services the showerhead (called the shower arm). However, it could also be leaking from the shower valve.
6. Fix a Leaking Shower Arm
If the shower arm is the reason your shower leaks behind the wall, it is not a difficult fix. On the shower wall side, take off the circular metal plate call the escutcheon that surrounds the shower arm. These escutcheons are decorative in nature and they are either split and can be removed without taking off the showerhead or they are solid which means you must unscrew the showerhead and slip the cover off.
Next, unscrew the shower arm and inspect it. Some reasons that shower arms leak are that it was not tightened properly or the threads aren’t sealed properly.
To fix the leak, clean the old joint compound off with a wire brush. Make sure the threads are clean and dry. Wrap the threads with Teflon plumbing tape (found at any hardware store), and screw the arm into the back into the water pipe joint. Old Pipe dope didn’t have a Teflon base so over time it yellows and cracks. In lieu of Teflon tape, you can buy Teflon pipe dope. You can buy a bottle with an integral brush. Brush on evenly covering all of the threads and screw back in place.
Related Read: Plumbing Tools The Homeowner Would Use
7. Fix a Leaking Shower Valve
Fixing a leaking shower valve to stop shower leaks behind the wall is a little trickier. When you turn on your tub/shower valve the hot and cold water enters the valve and mixes to the desired temperature.

First, most brands of shower valves use similar methods to install the valve. It’s hot water in, cold water in, mixed water to the showerhead, and mixed water to the tub. Unless you have a diverter valve to redirect the water to your shower head it’s usually a pull-type stop on the tub spout.
If the valve is leaking from the valve stem you may simply have to turn off the water to the valve and replace the cartridge. If it is a leak from the valve body itself then the valve needs to be cut out and replaced. When you cut out the valve make sure to out far enough from the valve that you can piece it in with a repair coupling. If you’re using PEX you don’t need to be near as precise.
- Complete flexibility: Delta’s MultiChoice universal valve gives you flexibility to upgrade your shower trim without…
- Recommended use: Compatible to meet the needs for the most commonly used plumbing methods and is ideal for shower units…
- Universal connection options: 1/2-inch universal inlets accept 1/2-inch copper, 1/2-inch iron pipe, PEX or CPVC adapters
Final Word on Shower Leaks Behind Walls
Fixing shower leaks behind the wall saves you money in water bills and expensive repairs. If the culprit is a leaking shower arm, the fix should be easy. A leaking shower valve may require a professional if you do not have the experience. Any time that you feel unsure, it is better to call a plumber than to let the problem persist.
Last update on 2021-05-01 at 08:22 / Affiliate links / Images from Amazon Product Advertising API
This post first appeared on http://www.theplumbinginfo.com