Category: Uncategorized

An Expert Guide on How to Drain a Hot Water Heater

Did you know DIY repairs can help you save about $20,000 in the long run? While DIY repairs are amazing for some projects, sometimes it creates more problems than it fixes. Sometimes visiting a water heater Toronto repair shop that has licensed professionals can be the best bet.

Although with this easy guide, you can learn how to drain your hot water heater in no time. From what to expect to how to get started, we’ll break down each step so you can learn how to fix the problem quickly and correctly.

Now, are you ready to get started? Here’s how to drain a hot water heater:

What to Expect

First and foremost, make sure you’re prepared for a leak to occur. There’s a possible chance the drain valve won’t completely close once you unfasten the tank. After all, the drain valve has been there for up to a year, possibly even longer, and the older it becomes, the less it will close completely.

In fact, 27 million households have water heaters that are over ten years old. Not many people consider that not all leaks occur due to a puncture of a fracture.

Instead, some leaks can happen as a result of the deterioration of materials. For example, aging and rusting can increase the chances of a leak.

With that in mind, be ready to put a stopper on the valve or have to replace the drain valve. The older the valve, the more likely there will be a leak of some form. Although, if your water heater has a plastic valve, then it might be time for an upgrade.

For those that are ready to take the leap, make sure to check out our affordable drain services. We provide free inspections, upfront pricing, and even a membership program for those that want to save even more money!

Step 1: Examine the Pressure-Relief Valve

Before you begin, make sure you check the pressure relief valve to ensure that it’s working correctly. To do that, turn off the water heater. Although, if it runs on gas, change the water heater to pilot mode.

Then, activate the lever on the valve to the cold water line. To reduce the mess that may take place, place a bucket below the pressure relief valve. That way, it ensures that if any sediment spills, it goes into the bucket, leaving you with a quick and easy cleanup solution.

Once the valve is opened, look for water or listen for the sound of air. If either happens, that means the valve is working correctly, and you can proceed to the next step.

However, if nothing happens, and you see no signs of dripping water and hear no air coming from the valve. Then, the valve most likely needs to be replaced.

Step 2: Start Running Your Drain

Place a hose from your water heater to around the exterior of your house. If your water heater is in your basement, you may need to connect two water hoses: one that runs from the heater to a portable pump and another that reaches the outside of your home. To be safe, make sure you wait several hours for the water to cool down before you open the drain valve.

Although if you want to speed up this process, take a long, hot shower. It works to efficiently speed up the draining process.

Step 3: Begin to Flush the Tank

After you open each and every hot water facet located in your home, go ahead and open the water heater drain valve. If you have a pump, it’s time to turn on that as well. Allow the tank to completely drain, then switch on the water supply.

It helps if there are shorts bursts of water as it will shift the sediment and help remove it. Although if you see that the sediment is starting to slow down or block the flow of water, try to get it out the way. You can do so by removing the drain valve so that sediment can be removed faster.

You can even get a long screwdriver to help you dislodge the big pieces of sediment. Just remember to keep a couple of buckets nearby as they’ll catch the outflow.

Step 4: Finish

When the water that’s coming out of the tank looks clear, switch off the water supply. Next, close the drain valve and turn on the cold water.

Although, make sure you also turn the pressure relief valve to its correct position. Then shut off all of the water facets you previously turned on in your home.

Lastly, make sure you turn on our water heater, which is now free and clear of sediment and debris.

Visit a Water Heater Toronto Repair Shop Today

Draining a water heater can be difficult, although, make sure you carefully follow these four steps, and you’ll be on the right track. Just be prepared for a leak to occur if you have an old, rusty, or cheap plastic valve. In that case, you might want to talk to an educated profession beforehand to see if you want to upgrade your entire water heater or just a few parts.

Whatever you decide, remember to place a bucket under the drain valve. Not only will it decrease the mess, but it will provide a quick and easy cleanup solution.

The post An Expert Guide on How to Drain a Hot Water Heater first appeared on Anta Plumbing Blog.

This post first appeared on https://blog.antaplumbing.com

Top Plumbing Tips for Preventing Toilet Clogs

Did you know that there are at least five incredible ways that toilets have changed the world? For starters, they help keep humans (as well as other living creatures) healthy. They do so by ensuring that human waste doesn’t end up straight in land and water systems.

Toilets even help prevent blindness, keep women safe, and save energy!

Unfortunately, when toilet clogs develop, they can bring more harm than good. For instance, they can give rise to sewer backups, which, in turn, can cause raw sewage to flood your home. Keep in mind that sewage may cause at least 15 types of diseases.

That’s why it’s best to keep your toilets clean and clear of clogs at all times. This way, you can protect your family’s health and also your home from wastewater damage.

To that end, we’ve come up with several ways on how you can avert toilet clogs. Keep reading to learn more about them, as well as what you should do in case you still run into these issues.

Think Twice Before You Flush a “Flushable” Product

From 2010 to 2018, the City of Toronto had an average of 10,000 calls per year from homes due to sewer “line-blocks.” That’s at least 80,000 logged reports for blocked sewer lines in just the city of T.O. alone!

Many of these line-blocks occurred due to none other than items labeled “flushable.” Unfortunately, they aren’t really flushable, meaning they don’t disintegrate as claimed.

In light of this, researchers from Ryerson University tested 101 single-use products. Of these, 23 claimed to be “flushable.” However, none of these, including the 23 so-called “flushable” items, passed the test.

With that said, one of the best ways on how to prevent toilet clogs is not to flush anything other than the three “Ps.” These “Ps” include pee, poop, and (toilet) paper. Don’t flush any other type of paper (such as facial tissue or paper towels).

The City also advises consumers not to flush wet or facial wipes, diapers, condoms, and tampons. These are among the biggest culprits behind sewer system line-blocks.

Educate the Kids About Proper Flushing Practices

Children’s toys are some of the most “curious” items found in sewage treatment plants in Canada. They even found an animal horn and a pair of dentures in Charlottetown sewers before! All these are things that shouldn’t really be going down the toilet.

With that said, it’s best to also teach the kids about proper flushing practices and etiquette. Educate them about flushing only the three “Ps” and how dumping toys in the toilet can cause problems. It’s also wise to tell them about proper toilet usage (such as how much of it to use) to keep toilet problems at bay.

FOG Should Never Go Down the Toilet (Or Any Other Drain)

FOG is an acronym for “fats, oil, and grease.” Municipalities in Canada shell out over $250 million to clean FOG mixed with trash each year.

FOG should never go down any drain, as these liquids can harden as they go through the drain pipes. They can also combine with other objects, such as food debris and wipes. They can even turn flushable toilet paper into a clog if they mix with it as the paper disintegrates.

Also, note that fats, oil, and grease are among the primary culprits of plumbing backups. That should be enough reason to dispose of these liquids properly.

Keep the Lid Down

A clogged toilet may also be due to someone accidentally dropping an object into it. These may include anything such as a toothbrush, comb, containers, toys, and pieces of cotton, to name a few. Either way, whatever you bring inside the bathroom can fall into the toilet bowl and cause a blockage in it.

You may even find yourself dropping precious jewelry by accident into the toilet! A professional plumber in Toronto may be able to retrieve it for you, though, using a plumbing camera and a snake.

In any case, the best way to avoid these situations (and toilet clogs) is to keep the toilet lid closed. You may also want to post a friendly reminder by the wall in front of the toilet. This way, everyone in your household can contribute to preventing plumbing clogs.

Consider Investing in Regular Drain Cleaning Services

One of the best times when to call a plumber for a clogged toilet is if you’ve already had several issues with it. Your plunger may no longer be enough to clear the drain away. Another is if the water in the toilet doesn’t recede even after several minutes from flushing it.

These are all signs that you have a massive clog in the toilet drain pipe or the bathroom drain line. This could turn into a potentially dangerous (and expensive) toilet backup problem.

With that said, it’s a smart idea to have a local licensed plumber clean your drains at least once every year. Do this even if your toilets and drains haven’t displayed any symptoms of clogs. Regular drain cleaning can help keep blockages from occurring in the first place.

In addition, a reliable plumber can also check your home for other potential causes of clogs. For example, trees growing near your sewer line may cause blockages in the future. That’s because their roots can wrap around and choke plumbing pipes.

If the above were to happen, you’d likely end up requiring more extensive pipe repairs. Worse, a clog in the main drain or sewer line can affect your home’s entire plumbing system.

So, rather than wait for these issues to occur, it’s best to prevent them from the get-go. A Toronto plumber can help you do that by assessing your home’s pipes for vulnerabilities.

Prevent and Address Toilet Clogs Before They Damage Your Home

There you have it, everything you need to know about keeping toilet clogs at bay. As you can see, many of these have to do with proper toilet (and flushing) practices. Keep these tips in mind, especially the three “Ps,” so you can reduce your risks of having clogged toilets.

Are you having problems with your toilet or any other part of your home’s plumbing system? If so, then please know that our team here at Anta Plumbing is always ready to help. Give us a call now so we can provide you with free expert advice and plumbing service quotes!

The post Top Plumbing Tips for Preventing Toilet Clogs first appeared on Anta Plumbing Blog.

This post first appeared on https://blog.antaplumbing.com

How Long You Can Expect Your Garbage Disposal to Last

Pouring-water-kitchen-sinkPeople often think of the garbage disposal in their kitchen sink as an appliance that will never need to be replaced. To them, it’s just a part of the structure of the kitchen, and until the day the kitchen gets a major renovation, the garbage disposal will hang around and keep doing its job.

This isn’t true, of course. No mechanical appliance can last forever, and a garbage disposal handles an immense workload, operating almost every day. Although a broken disposal can be fixed, at a certain point it will no longer be worth repairing and it’s best to have a new unit installed.

The question is, how long can you expect your garbage disposal to last?

First, “dull blades” aren’t the reason to replace a disposal

We want to get this misunderstanding out of the way. A disposal will wear down with time and use, but not because the blades in it have become dull. That’s because there aren’t any blades in a garbage disposal! If you look at a cut-away image of a disposal, you’ll see that it works by using blunt impellers to hurl food waste into an outer grind ring. A garbage disposal loses efficiency because of a failing motor.

Average disposal life expectancy

Now we can get to the raw numbers. The average kitchen sink garbage disposal will last from 8 to 15 years before it needs to be replaced. The wide range in life expectancy is because of the difference in how often people use their disposals and how well they treat them. If you often put objects down the disposal that shouldn’t go down it, you’ll shorten its service life. As a quick reminder, keep the following out of the disposal:

  • Actual garbage, like paper and plastic. Only food waste goes down the disposal.
  • Fats, oils, and grease.
  • Fruit pits, meat bones, and any food waste that you can’t chew with your teeth. If you can’t chew it, the disposal can’t grind it.
  • Pasta and rice, which absorb water and expand.
  • Stringy vegetables (celery, asparagus) and onion skins.

With a moderate amount of use and proper care, you may be able to get your disposal to the upper range of that 8 to 15 years.

How to know when the disposal is finished

If your garbage disposal is in the retirement age range, watch for indications that it’s coming to the end of its service life:

  • The kitchen sink is clogging often.
  • The disposal is making a racket each time it runs.
  • The disposal frequently trips its circuit breaker (the reset button on the bottom of the unit).
  • The disposal makes a humming noise.
  • Water is leaking from the disposal.
  • The disposal is running slower.

Please don’t attempt to replace the disposal yourself. You want a skilled plumber to handle any work for your garbage disposal in Glendale, AZ. Call our plumbers when you think you’re ready for a new disposal, and we’ll take care of everything.

The Trusted Plumber serves Glendale, AZ and the surrounding areas. Schedule service with a trusted plumber today!

This post first appeared on https://www.thetrustedplumber.com

How to Unclog a Bathroom Sink

The warning signs are there: pooling water and a gurgling sound. Perhaps there is even a foul odor rising up from the drain. Yes, these point to something every homeowner dreads—a sink clog. Leaving a clog alone and letting it worsen is never a wise decision, because it can open the door to more catastrophic water damage. So, if you want to get rid of those clogs, you need to first diagnose the problem then get to work unclogging your bathroom sink. 


Here is everything you need to know to do exactly that. 


What Are The Reasons For Clogged Bathroom Sinks?

It may be surprising how swiftly a bathroom sink can get clogged up, but it is generally caused by four things: 


Something Caught in the P-Trap

The p-trap is that curved piece right below the sink that is designed to trap noxious fumes from rising back into your home. The p-trap also has water, to create suction, and sometimes it gets congested with other things as well. Smaller items sometimes fall down the drain, like tiny caps, soap, rings, and the like. If these things can get stuck in the p-trap, it could cause clogs. 


Soap Scum

As the result of a chemical reaction between soap and the calcium and magnesium present in water, soap scum becomes a problem when it gathers alongside hair and other objects in the drain.


Hair 

When wet, hair clumps together and gets tangled up. Sometimes, it will catch on the walls of the pipes, where it gathers even more hair and soap scum. All kinds of hair can clump in the drain, including facial hair and animal fur. Be sure to clean your drains of hair regularly or use a strainer over the drain to prevent hair from going down. 


Damaged Piping 

Corrosion, rust, dents, and even old pipe joints can lead to clogs. While you cannot always prevent pipe damage, especially to older pipes, you can do routine maintenance and also replace any that are beginning to fail. If you can’t call in a professional. 


How to Unclog a Bathroom Drain?

Once you have diagnosed the reason behind your clogged drain, you can select the right method for removing the clog easily. If you don’t know the reason behind the congestion, you can run through this list from start to finish—just to be safe. 


You will notice that every method on this list uses natural remedies and never chemical cleaners. There is a reason for that. The harsh chemicals used in drain solutions can damage the inside of the pipes, creating an even bigger problem for you to deal with. Plus, the chemicals are not environmentally friendly. 


So, with that in mind, here are several ways to unclog a bathroom sink:

Baking soda and vinegar

  • Unscrew the drain and remove the stopper. 
  • Measure out 1 cup of vinegar and ½ cup of baking soda. 
  • Pour the ½ cup of baking soda down the drain first. 
  • Next, pour the vinegar. 
  • Let the mixture sit for at least several minutes, letting it fizz. Once the fizzing stops, run hot water. 
  • Repeat 2-3 times.


If baking soda and vinegar fail to work, you can also try boiling water. Pour it down after the baking soda and vinegar in intervals. Another liquid that works well is sodium hydroxide (or caustic soda). Leave it to sit around 30 minutes before using the drain. 

If you notice that there is a large amount of hair clogging up the drain, do the following: 

  • Remove the drain and the sink stopper. 
  • Check with a flashlight to see where the hair is located.
  • If the hair is close enough to get with a finger or fuzzy pipe cleaner, pull it out that way. Optionally, you can use a pair of tweezers. 
  • Can’t see the hair? A wire hanger can be of use. 
  • Slide the tool along the drain as far as it naturally goes. Do not force it, because you could damage the pipe. 
  • Push the tool around to get different angles. 
  • Repeat several times. Run some hot water in between attempts. 

Use a plunger

  • Grab a cup plunger and remove the drain and stopper. 
  • Seal the overflow outlet in the sink with either tape or a rag. 
  • Put some towels down around the sink. 
  • Fill the basin with water. It should be tepid. 
  • Create an airtight seal over the drain with the plunger. 
  • Pump the plunger. Make the movements quick and sharp. 
  • Test the drain to see if the clog has been cleared.
    Repeat if necessary. 

Clear the P-trap

  • Put on some rubber gloves and a bucket under the p-trap. 
  • Loosen the nuts around the p-trap so you can remove it. You may need pliers.
  • Remove the p-trap, letting any water pour into the bucket. 
  • Look for any objects that may be trapped in the pipe. 
  • Clean out the p-trap with a toothbrush or bristle brush. 
  • Fasten the p-trap and do a quick test to see if water drains.  


If water still doesn’t drain, try this last step:

Snaking

  • If you have a plumber’s snake (also known as a plumbing auger) you can use it. Put down some towels to prevent water from getting everywhere. 
  • Remove the p-trap and the stopper. 
  • Start threading the snake down the drain. 
  • Once you reach the clog, rotate the snake’s head back and forth and up and down. 
  • You should feel the clog dislodge. Pull the auger free then reassemble the sink. 
  • Check to make sure water drains. 


If none of the tips help you unclog your bathroom sink, then it is more than just a simple tangle of hair and soap scum. That means it is time to bring in a professional. Having a qualified plumber on the job will eliminate a lot of stress, because you know the problem will be found, and the clog will be dealt with accordingly. 


Still can’t solve your clogged bathroom sink issue? Call us today to get help. 

The post How to Unclog a Bathroom Sink appeared first on The Irish Plumber.

Why is There a Sulfur Smell Coming from Your Drain?

Did you know that Canada’s plumbing sector is a $14 billion industry? That’s how in-demand plumbers are, seeing as each one of us rely on plumbing systems, every single day.

There’s no doubt that plumbers are critical workers, seeing as plumbing is vital to daily life. Indeed, the Canadian Government has deemed plumbers as essential workers.

With that said, you may be wondering if that sulfur smell in your home warrants a call to Toronto plumber. You may be hoping for the rotten egg smell to dissipate in a few hours before you ring up a plumbing pro.

Depending on where the smell is coming from, it may warrant immediate attention.

This post will share some of the most important facts about sulfur-smelling gases at home, so be sure to read on.

What’s That Sulfur Smell Anyway?

Hydrogen sulfide (H2S) is a gas that smells like sulfur, which in turn, carries the odor of rotten eggs. It’s the same gas that permeates the water in hot springs.

At home, however, a sulfur smelling gas can either come from sewer gases or natural gas. Sewer gases consist not only of H2S but also ammonia and others like methane and carbon dioxide.

Natural gas, on its own, is odorless. However, gas suppliers add a chemical called “mercaptan” to it to make leaks easier to detect. Like H2S, mercaptan smells like sulfur or rotten eggs too.

A sulfur smelling gas that comes from your home’s drains, however, is more likely due to sewer gases. These are the gases produced by waste products as they naturally breakdown and decay.

Is Sulfur Smelling Gas In Your Home Dangerous?

If the smell is from a natural gas leak, it is dangerous, as it can cause explosions. One way to tell that the sulfur-like smell is from a gas leak is if you also hear a hissing sound from the gas tank itself. In case you ever experience this, be sure to call the authorities or your utility provider ASAP.

If sewer gas is to blame, you don’t have to panic, since, at very low levels, it isn’t dangerous. However, the gases can still pose hazards if they get trapped in an ill-ventilated space. Over time, these entrapped gases can accumulate and reach toxic levels.

Note, though, that the Canadian Government classifies pure hydrogen sulfide as very toxic. In elevated levels, it can cause adverse effects like breathing difficulties. It can also harm and irritate the skin and the eyes.

How to Tell If the Foul Smells Are Coming Out of Your Drains

Sometimes, plumbing-related sulfur odors can be due to the water itself. The City of Toronto monitors over 150 possible compounds in its drinking water. This includes sulfate, which can react with other elements in the water to form H2S.

To determine if it’s the water or the drain that smells like sulfur, take a glass of water from one of your faucets. Go outside and take a whiff of the water. If it smells like rotten eggs, repeat the steps using a different tap.

If the second glass of water still smells like sulfur, then the culprit is most likely your water.

If both glasses smell fine, run the same faucets you took water from and let the water drain. Stand near the sink as the water flows into the drain. If the sulfur smell from the sink becomes stronger, what you’re inhaling is likely sewer gas.

Causes of Sulfur Smell Related to Your Toronto Home’s Plumbing System

Clogs in drains are among the most common causes of sulfur smells in houses. Loose toilets, cracked or damaged pipes, as well as blocked vents, can also leak sewer gases into your home. In some cases, plumbing systems that dry out are also to blame.

Clogged Drains

The drains in your Toronto home are responsible for channeling waste out of your home. However, incorrect waste disposal practices can result in clogs forming inside drain pipes. If this happens, organic materials can start to decay from within the drain pipes.

Such materials include food debris, hair, and pet waste among many others. As for food, FOG, which stands for fats, oil, and grease, is among the biggest culprits. FOG buildups contribute to Canada’s yearly spending of $250 million to clean up sewers.

In any case, unremoved clogs in drains can continue to breakdown and release sewer gases. The gases can then flow out of the holes of your drain covers.

If you’ve also noticed signs of blocked drains aside from the sulfur smell, take that as a sign to call a plumber. This way, the Toronto plumbing specialist can clear those drains right away. Not only will this get rid of the rotten egg smell; it’ll also restore the health of your drains.

Problems With Toilet Seals

Toilet problems, such as a broken or a loose seal, can also cause a sulfur smell in the bathroom. The gaps that these damaged or detached seals create can allow sewer gases to escape and enter the room.

Aside from the sewer smell, you may also notice that the toilet bowl doesn’t fill up the way it used to.

Blockages in the Vents of Your Drain-Waste-Vent System

The plumbing system in your Toronto home consists of not just drain and waste pipes, but also vent pipes. Together, all these pipes make up the drain-waste-vent (DWV) system.

Drain pipes collect wastewater from kitchen and bathroom sinks, shower, and tub drains. These are also the pipes that collect used water from the dishwasher and washing machine.

Waste pipes, in turn, remove water and waste material from the toilet.

The vent pipes, on the other hand, don’t carry water; instead, they deal with air and gases. These are the pipes that allow air to get into the system to help facilitate the flow of wastewater. They are also the ones that remove sewer gases from your home.

As such, if the vent pipes get clogged with dirt or debris, they will be unable to exhaust sewer gases. With nowhere else to go, the sewer gases can leak into your home.

Dry P-Traps

P-traps are pipes that resemble the letter P (or sometimes, U). They connect to the drains of each of your plumbing fixtures. Each toilet and appliance (like your dishwasher and clothes washer) also has its own P-trap.

P-traps that work fine hold enough standing water, which then acts as a seal. This sealing effect, in turn, keeps sewer gases from being able to creep up the drains. Whenever you use a fixture, that water gets “replenished,” ensuring a constant seal.

If you have sinks, toilets, or drains that you don’t use often, then the water in their P-trap may have dried out. Since the pipe no longer has a “seal,” then it may be the culprit behind the sulfur smell in your house. Most often, you can fix this by simply running the water to refill the dried out P-trap.

If that doesn’t do the trick, try running water through all of your other drains. If this still doesn’t get rid of the sulfur smell, then you may be dealing with leaky or damaged P-traps. It’s best to call a Toronto plumber to have a look at your home’s plumbing pipes.
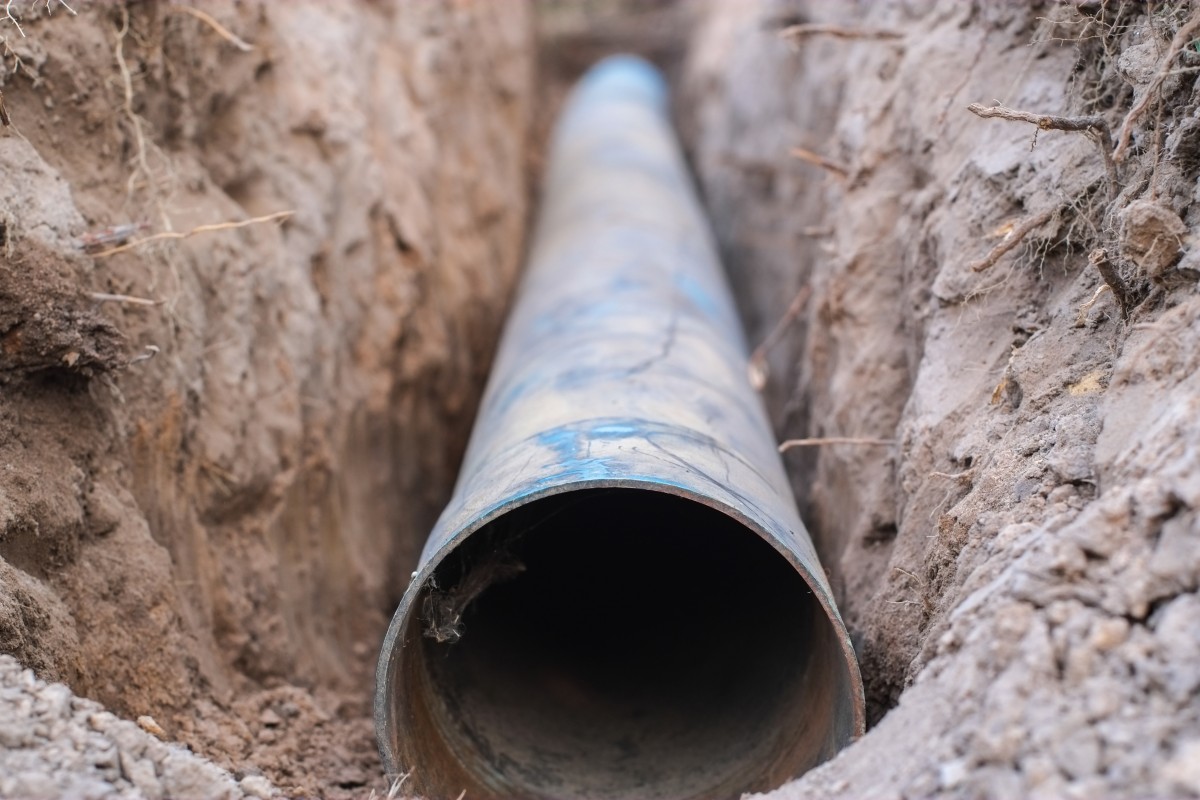
Cracked Pipes

Sewer gases can leak out of any cracked or damaged pipe within your Toronto home’s DWV system. Sometimes, the damages are easy enough to fix with a seal or replacement pipe. This is true for easy-to-access pipes, such as those that you can find under the sink.

However, there are many cases wherein the damaged pipe is behind the wall or underground. It’s even possible that your sewer line itself may be the culprit behind the sulfur smell. In this case, you may already require sewer repair or replacement.

Plumbing Backups

Each year, Canada sees about 19.5 million cases of acute gastrointestinal diseases. Many of these are a result of exposure to pathogens that contaminate food and water. As you can imagine, many of these disease-causing microorganisms are in raw wastewater.

You can get exposed to untreated wastewater or sewage if you experience a drain backup. This is what clogged drains and sulfur-like smells ultimately lead to.

With that said, if water backs up from your sink or floor drains, please get in touch with a plumber right away. This way, your local plumbing expert can address not just the sewer smells, but the root cause of the backup too.

What to Do If Your Drains Emit Sewer Smells

Ultimately, you’d want to get in touch with drain cleaning experts at the first sign of sulfur smells. In doing so, you can avoid the clogs from causing more severe problems like backups. At the same time, having your drains cleaned by a pro can restore the efficiency of your DWV system.

In the meantime, here are some of the things you can do to get rid of or reduce the stinky odors.

Clean and Sanitize Your Garbage Disposal

Bits and pieces of food debris can get stuck on the pits or blades of your garbage disposal. It can take as little as two hours for bacteria to start breaking down these tiny pieces of food. Also, keep in mind that most bacteria grow quickly in temperatures between 40 °F and 140 °F.

From there, the rotting food can then start to emit sulfur-like odors and other bad smells.

As such, always make it a habit to clean and sanitize your sinks, sink drains, and garbage disposal. Dropping a few cubes of ice into the disposal system before running it can help get rid of any stuck debris. Lemon, which is antibacterial, may also help reduce smells and sanitize your drains.

Try a Homemade Drain Smell Remover

You can also clean all other drains using baking soda, vinegar, and hot water. For each drain, pour about half a cup of baking soda. Then, tip in a cup of vinegar into the drain, followed by hot water.

Baking soda and vinegar may help not only reduce the smells but also kill some of the bacteria too. Baking soda, according to scientists, does have antimicrobial properties. The acid in vinegar may also help get rid of some pathogens hiding in your drains.

Remove Any Obstruction on Drain Covers

Biofilm, which is a buildup of bacteria, can form on plumbing fixtures and drains. You may have seen this gooey, disgusting substance around the base of your taps. You may have also encountered it during those times that you inspected your drain covers.

Since biofilm is a collection of bacterial species, it can also produce bad smells. They often smell like mold or sewage, but they may also give off a rotten egg odor.

With that said, you’d want to get rid of biofilm before they stink up your sinks or bathroom. However, be sure to don gloves before you clear the covers of your drains. Your homemade solution of baking soda and vinegar may also help get rid of this substance.

Preventive Measures To Avoid Stinky Sulfur or Sewer Smells

One of the best ways to keep these foul smells at bay is to properly dispose of food waste. Never pour fats, oil, or grease down your sinks and drains. They may be liquid now, but it won’t take long for them to congeal.

Unfortunately, FOG can solidify while they’re still flowing through your drain pipes.

What you should do instead is to collect used FOG in a sealable container, such as a jar. Once it’s full, you can then scrape out the contents into your green bin.

Aside from keeping bad smells at bay, proper waste disposal also reduces risks of clogs. This also helps you prevent sewage backups from occurring and damaging your home.

It’s also a good idea to have your DWV system undergo routine check-ups and cleaning. This way, you can address potential clogs before they become bigger and cause more issues.

Say Goodbye to Foul Sulfur or Sewer Odors

There you have it, all the essential facts you need to know about the sulfur smell coming out of your drains. You may want to try the DIY solutions we’ve mentioned, but if none of them work, it’s time to go pro. Also, for your safety, please make sure that the rotten egg smell isn’t due to a natural gas leak.

If the DIY fixes don’t help, then please know that our team here at Anta Plumbing is happy to help. Feel free to get in touch with us so we can help you get rid of those foul drain smells.

The post Why is There a Sulfur Smell Coming from Your Drain? first appeared on Anta Plumbing Blog.

This post first appeared on https://blog.antaplumbing.com

Video Camera Inspection and Leak Detection Services

leak detection

Water leaks and related problems in your home can be tricky to identify. Water can travel a long distance from the source of the problem, so where you see water on your walls, ceiling or floor may not really be the area that needs our attention. That’s why we offer video camera inspection and leak detection services.

About our video camera inspection and leak detection services?

Our leak detection services allow us to examine places in your home that are inaccessible to a person, places like under your home’s concrete slab or behind your drywall. It’s not just older homes that can experience water leaks and burst pipes. Shoddy construction, settling and corrosion can also cause major plumbing problems. Left un-repaired, such leaks can eventually destroy your home and lead to mold and mildew, which can make your home uninhabitable, not to mention wasting gallons and gallons of water and driving up your water bill.

Our Florida leak detection specialists use state-of-the-art equipment to find the source of your water leak, so we can repair the problem with a minimal of damage to your property. We use a small video camera to peek inside your walls to see where the water is coming from.

Signs of a hidden water leak

1. Higher than normal water bills. If you see a sudden spike in your water bill, that’s a sure sign that something is wrong somewhere in your plumbing system. If you use a well and a well pump for your water supply, this change will show up in your electricity bill. After you’ve ruled out leaky fixtures and faucets, it’s time to call in the professionals to find the root of the problem.

2. A damp, musty smell. Water leaking behind your walls or in your crawl space will lead to a stale, moldy odor.

3. Discoloration on your drywall. A leaking pipe can also lead to water spots on your drywall.

To learn more about video camera inspection and leak detection services for your Florida home and to make an appointment, visit our Get a Free Quote page or call us at 954-981-2133.

Trending Topics Right Now

This post first appeared on http://www.atozstatewideplumbing.com

Is It Time to Repipe?

leaking-pipe
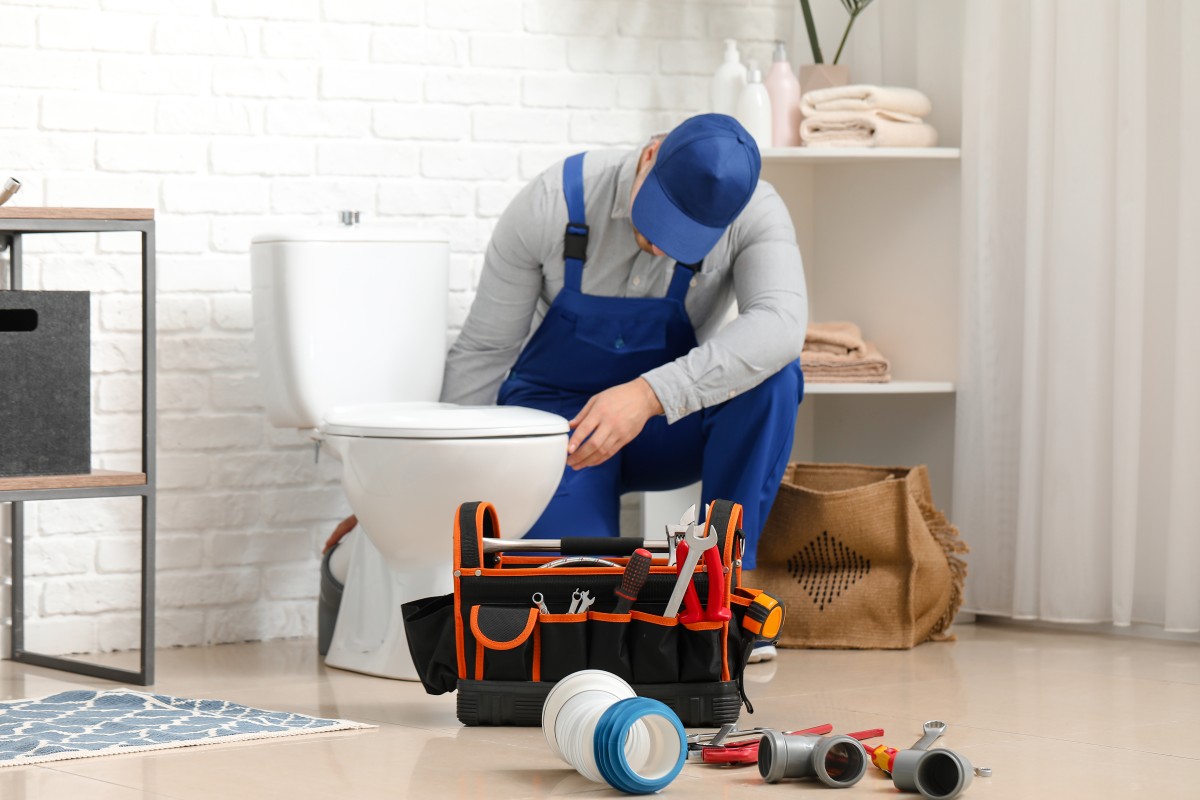
Your plumbing is an important part of your home, but we think it’s safe to say that you probably don’t think about it too often. We’re not here to pass judgment when it comes to this. We know that we’re the professionals that have made plumbing our livelihood, but this is understandable from a homeowner’s perspective.

If you’re trying to pay more attention to your plumbing now we’re here to help you. We can tell you when you need to repipe in Orlando, FL. We’ve got your back with absolutely everything that you need. We’re the qualified professionals here in Florida. We can help you with absolutely everything you need.

You Need to Repipe When…

Here are a few of the key signs that you need to repipe your home here in Orlando.

1.      Your Home Is Old

How old is your home? If your home is around 50 years or older, then it’s time for you to consider upgrading your home’s pipes. Older pipes are typically made of galvanized steel. This isn’t what most professionals use for piping anymore because it corrodes. If you’ve found that the test of time is wearing down your pipes, then it’s time for you to contact our professionals.

2.      You’ve Got Build Up

Have you noticed that rust or mineral build-up is a problem throughout your home? If you’re noticing this issue, then you might also be noticing a foul odor coming from your water too. We know that this is concerning. It just means that your pipes are breaking down. This isn’t something that you want to ignore. You need to take note of your build-up and call us for repiping work.

3.      Your Water Is Discolored

Have you noticed that the color off your water is a little off? You know like we know that your water should always be clear. If it’s tinged a different color then you need to repipe your home. Your plumbing system is corroding, and the sediment and the debris are picking up in your water supply. Discolored water is a problem. We can help you fix this problem in a flash.

4.      Your Home Leaks All the Time

Are you dealing with leaks on a constant basis? This isn’t something that you should deal with. We know that you’re going to experience a leak or two at least once or twice in your home, but least shouldn’t be constant. If they are then you need our help with repiping.

5.      You Have Water Pressure Problems

You hop in the shower ready for a strong, steady stream of water to pour over you, and instead, you feel something that’s more like a trickle from a watering can—what’s going on? You’ve noticed that you’ve had consistent issues with your water pressure lately. It just doesn’t seem to be as strong as it used to be. If this is the case, then you need to schedule an appointment with our professionals.

Call us today. Our professionals are here when you’re ready to start the process.

Contact Modern Plumbing Industries, Inc. today to schedule an appointment with our professionals.

This post first appeared on https://www.modernpi.com

10 AC Efficiency Tips

10 Tips? Did you hear that right? How can there be that many air conditioning tips to increase efficiency, longevity, and the overall health of your system? Well, take it from your local HVAC contractor that there are probably even more tips out there! Best practices and DIY tips exist in many forms, whether it’s home improvement, keeping your car in good shape, or even helping your comfort systems keep you happy.

The most important aspect to remember when it comes to AC efficiency is taking the right person’s word. If you listen to an amateur talk about air conditioning repair in Wayne, NJ, then you’re likely going to get a whole different set of ideas. Our team is licensed and certified to talk about this type of work, so our tips are bound to keep your system healthy and happy.

Let’s Get Started!

Don’t feel overwhelmed. Take this list and post it on your fridge to take it one step at a time. The closer you get towards AC efficiency, the less you’ll have to call us!

1. Don’t Work Your AC Too Hard

Temperatures can only realistically be cooled no more than 20 degrees below what it’s like outside. If temperatures are 90 degrees outdoors, don’t try to get the indoor temperatures cooler than 70. Otherwise, your AC will work too hard for very little results.

2. Notice Noises

Aside from a slight clicking and the sound of air whooshing through the vents, your AC shouldn’t make any noises. If it does, it could be a sign that something is working inefficiently.

3. Notice Smells

Smells can be a great way to notice that there’s a condensate drain clog or some other leak that’s occurring due to inefficiency. Get this addressed as soon as possible.

4. Replace the Air Filter

The air filter of your air conditioner should be replaced every 1-3 months. This helps keep it running at peak efficiency.

5. Keep Vents Clear

How is the air supposed to get into your home, cool it down, and activate the thermostat sensor when your vents are blocked? Make sure all your air vents are clear

6. Run Your Ceiling Fan

Ceiling fans can be a great way to ease the burden on your air conditioner. Just one running ceiling fan can lower temperatures by a few degrees at a fraction of the energy cost an AC requires.

7. Use Your Blinds or Curtains

Blinds or curtains can help stop the sunlight from entering your home and heating things up even more.

8. Invest in a Dehumidifier

Your air conditioner might dehumidify your air, but it’s not meant to do that more than a little bit. Investing in a dehumidifier can help ease the burden on your AC and lessen energy consumption.

9. Keep the Area Clean

Your outdoor air conditioner cabinet needs proper space to vent the heat. If it’s constantly covered in debris, pebbles, dust, and even inhabited by critters, you’ll see a dramatic decrease in efficiency.

10. Sign Up for Maintenance

Maintenance can be one of the best ways to ensure the maximum efficiency of your air conditioner. Be sure to schedule this once a year for proper AC care!

The team at MarGo Plumbing Heating Cooling Inc. has your back. Call us today!

This post first appeared on https://margoplumbing.com

+1-877-959-3534